

In this tutorial, we will install and configure an ownCloud instance on an Ubuntu 18.04 server.
Prerequisites
In order to complete the steps in this guide, you will need the following:
A sudo user and firewall on your server: You can create a user with sudo privileges and set up a basic firewall by following the Ubuntu 18.04 initial server setup guide.
A LAMP stack: ownCloud requires a web server, a database, and PHP to function properly. Setting up a LAMP stack (Linux, Apache, MySQL, and PHP) server fulfills all of these requirements. Follow this guide to install and configure this software.
An SSL certificate: How you set this up depends on whether or not you have a domain name that resolves to your server.
If you have a domain name… the easiest way to secure your site is with Let’s Encrypt, which provides free, trusted certificates. Follow the Let’s Encrypt guide for Apache to set this up.
If you do not have a domain… and you are just using this configuration for testing or personal use, you can use a self-signed certificate instead. This provides the same type of encryption, but without the domain validation. Follow the self-signed SSL guide for Apache to get set up.
Step 1 – Installing ownCloud
The ownCloud server package does not exist within the default repositories for Ubuntu. However, ownCloud maintains a dedicated repository for the distribution that we can add to our server.
To begin, download their release key using the curl command and import it with the apt-key utility with the add command:
curl https://download.owncloud.org/download/repositories/10.0/Ubuntu_18.04/Release.key | sudo apt-key add -
Copy
The ‘Release.key’ file contains a PGP (Pretty Good Privacy) public key which apt will use to verify that the ownCloud package is authentic.
In addition to importing the key, create a file called owncloud.list in the sources.list.d directory for apt. The file will contain the address to the ownCloud repository.
echo 'deb http://download.owncloud.org/download/repositories/10.0/Ubuntu_18.04/ /' | sudo tee /etc/apt/sources.list.d/owncloud.list
Copy
Now, we can use the package manager to find and install ownCloud. Along with the main package, we will also install a few additional PHP libraries that ownCloud uses to add extra functionality. Update your local package index and install everything by typing:
sudo apt update
sudo apt install php-bz2 php-curl php-gd php-imagick php-intl php-mbstring php-xml php-zip owncloud-files
Copy
Everything we need is now installed on the server, so next we can finish the configuration so we can begin using the service.
Step 2 — Adjusting the Document Root
The ownCloud package we installed copies the web files to /var/www/owncloud on the server. Currently, the Apache virtual host configuration is set up to serve files out of a different directory. We need to change the DocumentRoot setting in our configuration to point to the new directory.
You find which virtual host files reference your domain name or IP address using the apache2ctl utility with the DUMP_VHOSTS option. Filter the output by your server’s domain name or IP address to find which files you need to edit in the next few commands:
sudo apache2ctl -t -D DUMP_VHOSTS | grep server_domain_or_IP
Copy
The output will probably look something like this:
Output*:443 server_domain_or_IP (/etc/apache2/sites-enabled/server_domain_or_IP-le-ssl.conf:2)
port 80 namevhost server_domain_or_IP (/etc/apache2/sites-enabled/server_domain_or_IP.conf:1)
In the parentheses, you can see each of the files that reference the domain name or IP address we’ll use to access ownCloud. These are the files you’ll need to edit.
For each match, open the file in a text editor with sudo privileges:
sudo nano /etc/apache2/sites-enabled/server_domain_or_IP.conf
Copy
Inside, search for the DocumentRoot directive. Change the line so that it points to the /var/www/owncloud directory:
Example DocumentRoot edit
<VirtualHost *:80>
. . .
DocumentRoot /var/www/owncloud
. . .
</VirtualHost>
Copy
Save and close the file when you are finished. Complete this process for each of the files that referenced your domain name (or IP address if you did not configure a domain for your server).
When you are finished, check the syntax of your Apache files to make sure there were no detectable typos in your configuration:
sudo apache2ctl configtest
Copy
OutputSyntax OK
Depending on your configuration, you may see a warning about setting ServerName globally. As long as the output ends with Syntax OK, you can ignore that warning. If you see additional errors, go back and check the files you just edited for mistakes.
If your syntax check passed, reload the Apache service to activate the new changes:
sudo systemctl reload apache2
Copy
Apache should now know how to server your ownCloud files.
Step 3 – Configuring the MySQL Database
Before we move on to the web configuration, we need to set up the database. During the web-based configuration process, we will need to provide an database name, a database username, and a database password so that ownCloud can connect and manage its information within MySQL.
Begin by logging into your database with the MySQL administrative account:
sudo mysql
Copy
If you set up password authentication for MySQL root account, you may have to use this syntax instead:
mysql -u root -p
Copy
Create a dedicated database for ownCloud to use. We will name the database owncloud for clarity:
CREATE DATABASE owncloud;
Copy
Note: Every MySQL statement must end with a semi-colon (;). Be sure to check that this is present if you are experiencing an issue.
Next, create a separate MySQL user account to manage the newly created database. Creating one-function databases and accounts is a good idea from a management and security standpoint. As with the naming of the database, choose a username that you prefer. We elected to go with the name owncloud in this guide.
GRANT ALL ON owncloud.* to 'owncloud'@'localhost' IDENTIFIED BY 'owncloud_database_password';
Copy
Warning: Be sure to put an actual password where the command states: owncloud_database_password
With the user assigned access to the database, perform the flush privileges operation to ensure that the running instance of MySQL knows about the recent privilege assignment:
FLUSH PRIVILEGES;
Copy
You can now exit the MySQL session by typing:
exit
Copy
With the ownCloud server installed and the database set up, we are ready to turn our attention to configuring the ownCloud application.
Step 4 – Configuring ownCloud
To access the ownCloud web interface, open a web browser and navigate to the following address:https://server_domain_or_IP
Note: If you are using a self-signed SSL certificate, you will likely be presented with a warning because the certificate is not signed by one of your browser’s trusted authorities. This is expected and normal. Click the appropriate button or link to proceed to the ownCloud admin page.
You should see the ownCloud web configuration page in your browser.
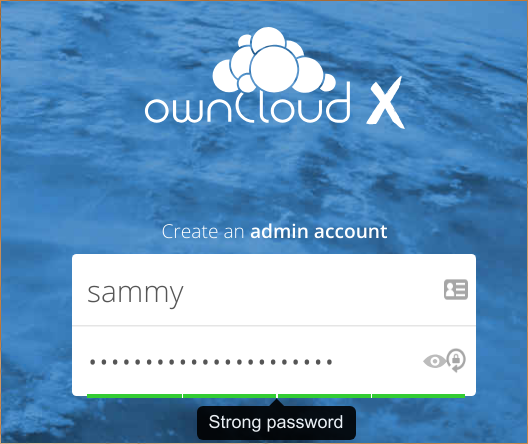
Create an admin account by choosing a username and a password. For security purposes it is not recommended to use something like “admin” for the username:
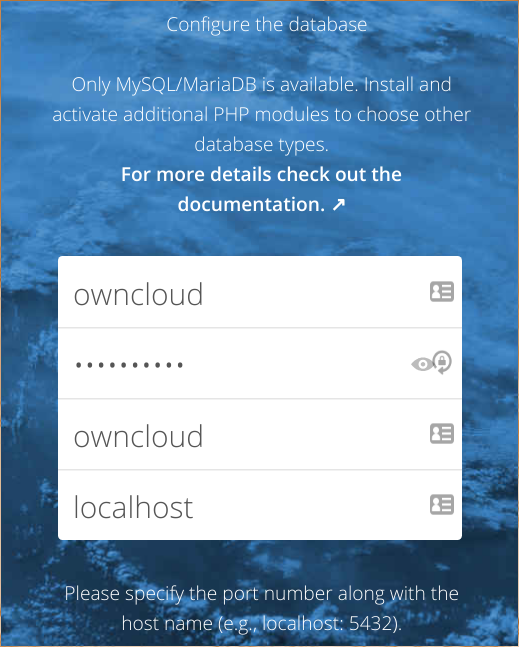
Next, leave the Data folder setting as-is and scroll down to the database configuration section.
Fill out the details of the database name, database username, and database password you created in the previous section. If you used the settings from this guide, both the database name and username will be owncloud. Leave the database host as localhost:
Click the Finish setup button to finish configuring ownCloud using the information you’ve provided. You will be taken to a login screen where you can sign in using your new account:

On your first login, a screen will appear where you can download applications to sync your files on various devices. You can download and configure these now or do it at a later time. When you are finished, click the x in the top-right corner of the splash screen to access the main interface:
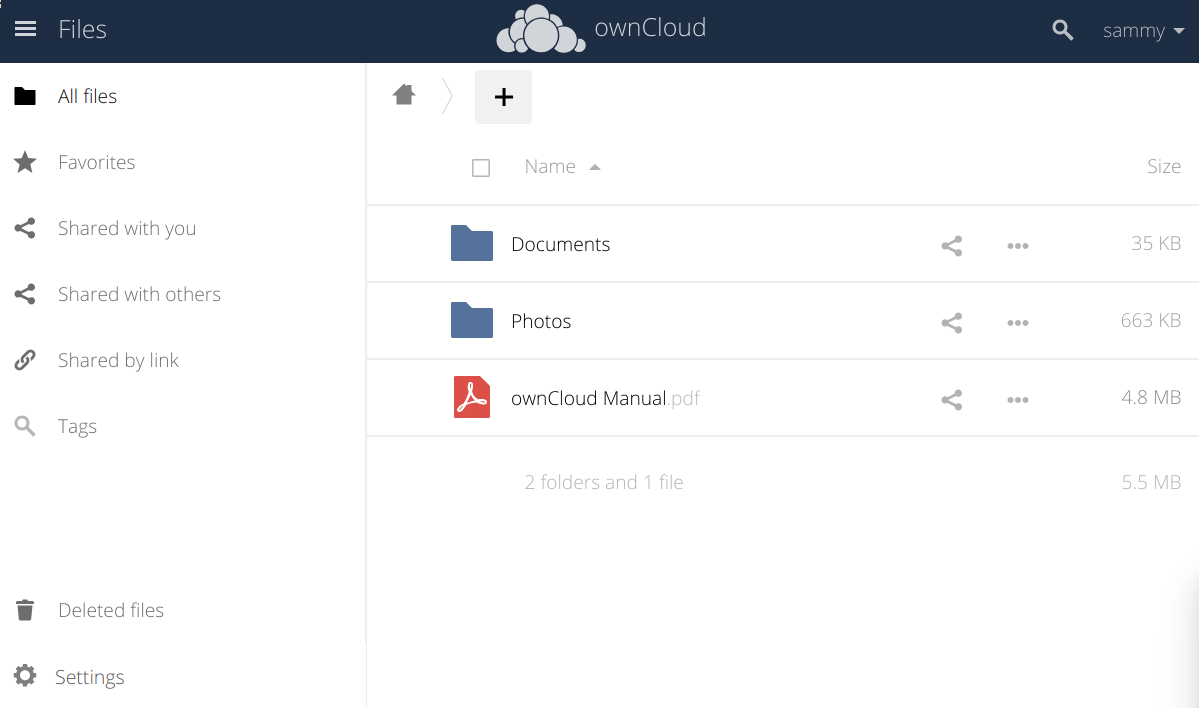
Here, you can create or upload files to your personal cloud.
Conclusion
ownCloud can replicate the capabilities of popular third-party cloud storage services. Content can be shared between users or externally with public URLs. The advantage of ownCloud is that the information is stored in a place that you control and manage without a third party.


