Tutorial Social Network

Informasi Seputar Media Sosial

Tutorial Computer

Informasi Seputar Komputer

Tutorial Youtube

Informasi Seputar Youtube

Tutorial Blogger

Informasi Seputar Blogger

Tutorial Wordpress

Informasi Seputar Wordpress

Tutorial Website

Informasi Seputar Pemrograman Website

Tutorial Windows

Informasi Seputar Sistem Operasi Windows

Tutorial Linux

Informasi Seputar Sistem Operasi Linux

Tutorial Android

Informasi Seputar Android

Showing posts with label Tutorial Linux. Show all posts

Tuesday, 16 February 2021

How To Install and Configure ownCloud on Ubuntu

ownCloud is an open-source file sharing server and collaboration platform that can store your personal content, like documents and pictures, in a centralized location. This allows you to take control of your content and security by not relying on third-party content hosting services like Dropbox.

In this tutorial, we will install and configure an ownCloud instance on an Ubuntu 18.04 server.
Prerequisites
In order to complete the steps in this guide, you will need the following:
A sudo user and firewall on your server: You can create a user with sudo privileges and set up a basic firewall by following the Ubuntu 18.04 initial server setup guide.
A LAMP stack: ownCloud requires a web server, a database, and PHP to function properly. Setting up a LAMP stack (Linux, Apache, MySQL, and PHP) server fulfills all of these requirements. Follow this guide to install and configure this software.
An SSL certificate: How you set this up depends on whether or not you have a domain name that resolves to your server.
If you have a domain name… the easiest way to secure your site is with Let’s Encrypt, which provides free, trusted certificates. Follow the Let’s Encrypt guide for Apache to set this up.
If you do not have a domain… and you are just using this configuration for testing or personal use, you can use a self-signed certificate instead. This provides the same type of encryption, but without the domain validation. Follow the self-signed SSL guide for Apache to get set up.

Step 1 – Installing ownCloud
The ownCloud server package does not exist within the default repositories for Ubuntu. However, ownCloud maintains a dedicated repository for the distribution that we can add to our server.

To begin, download their release key using the curl command and import it with the apt-key utility with the add command:

curl https://download.owncloud.org/download/repositories/10.0/Ubuntu_18.04/Release.key | sudo apt-key add -

Copy
The ‘Release.key’ file contains a PGP (Pretty Good Privacy) public key which apt will use to verify that the ownCloud package is authentic.

In addition to importing the key, create a file called owncloud.list in the sources.list.d directory for apt. The file will contain the address to the ownCloud repository.

echo 'deb http://download.owncloud.org/download/repositories/10.0/Ubuntu_18.04/ /' | sudo tee /etc/apt/sources.list.d/owncloud.list

Copy
Now, we can use the package manager to find and install ownCloud. Along with the main package, we will also install a few additional PHP libraries that ownCloud uses to add extra functionality. Update your local package index and install everything by typing:

sudo apt update
sudo apt install php-bz2 php-curl php-gd php-imagick php-intl php-mbstring php-xml php-zip owncloud-files

Copy
Everything we need is now installed on the server, so next we can finish the configuration so we can begin using the service.
Step 2 — Adjusting the Document Root

The ownCloud package we installed copies the web files to /var/www/owncloud on the server. Currently, the Apache virtual host configuration is set up to serve files out of a different directory. We need to change the DocumentRoot setting in our configuration to point to the new directory.

You find which virtual host files reference your domain name or IP address using the apache2ctl utility with the DUMP_VHOSTS option. Filter the output by your server’s domain name or IP address to find which files you need to edit in the next few commands:

sudo apache2ctl -t -D DUMP_VHOSTS | grep server_domain_or_IP

Copy
The output will probably look something like this:
Output*:443 server_domain_or_IP (/etc/apache2/sites-enabled/server_domain_or_IP-le-ssl.conf:2) port 80 namevhost server_domain_or_IP (/etc/apache2/sites-enabled/server_domain_or_IP.conf:1)

In the parentheses, you can see each of the files that reference the domain name or IP address we’ll use to access ownCloud. These are the files you’ll need to edit.

For each match, open the file in a text editor with sudo privileges:

sudo nano /etc/apache2/sites-enabled/server_domain_or_IP.conf

Copy
Inside, search for the DocumentRoot directive. Change the line so that it points to the /var/www/owncloud directory:
Example DocumentRoot edit
<VirtualHost *:80> . . . DocumentRoot /var/www/owncloud . . . </VirtualHost>

Copy
Save and close the file when you are finished. Complete this process for each of the files that referenced your domain name (or IP address if you did not configure a domain for your server).

When you are finished, check the syntax of your Apache files to make sure there were no detectable typos in your configuration:

sudo apache2ctl configtest

Copy
OutputSyntax OK

Depending on your configuration, you may see a warning about setting ServerName globally. As long as the output ends with Syntax OK, you can ignore that warning. If you see additional errors, go back and check the files you just edited for mistakes.

If your syntax check passed, reload the Apache service to activate the new changes:

sudo systemctl reload apache2

Copy
Apache should now know how to server your ownCloud files.
Step 3 – Configuring the MySQL Database

Before we move on to the web configuration, we need to set up the database. During the web-based configuration process, we will need to provide an database name, a database username, and a database password so that ownCloud can connect and manage its information within MySQL.

Begin by logging into your database with the MySQL administrative account:

sudo mysql

Copy
If you set up password authentication for MySQL root account, you may have to use this syntax instead:

mysql -u root -p

Copy
Create a dedicated database for ownCloud to use. We will name the database owncloud for clarity:

CREATE DATABASE owncloud;

Copy
Note: Every MySQL statement must end with a semi-colon (;). Be sure to check that this is present if you are experiencing an issue.

Next, create a separate MySQL user account to manage the newly created database. Creating one-function databases and accounts is a good idea from a management and security standpoint. As with the naming of the database, choose a username that you prefer. We elected to go with the name owncloud in this guide.

GRANT ALL ON owncloud.* to 'owncloud'@'localhost' IDENTIFIED BY 'owncloud_database_password';

Copy
Warning: Be sure to put an actual password where the command states: owncloud_database_password

With the user assigned access to the database, perform the flush privileges operation to ensure that the running instance of MySQL knows about the recent privilege assignment:

FLUSH PRIVILEGES;

Copy
You can now exit the MySQL session by typing:

exit

Copy
With the ownCloud server installed and the database set up, we are ready to turn our attention to configuring the ownCloud application.
Step 4 – Configuring ownCloud

To access the ownCloud web interface, open a web browser and navigate to the following address:https://server_domain_or_IP


Note: If you are using a self-signed SSL certificate, you will likely be presented with a warning because the certificate is not signed by one of your browser’s trusted authorities. This is expected and normal. Click the appropriate button or link to proceed to the ownCloud admin page.

You should see the ownCloud web configuration page in your browser.

Create an admin account by choosing a username and a password. For security purposes it is not recommended to use something like “admin” for the username:
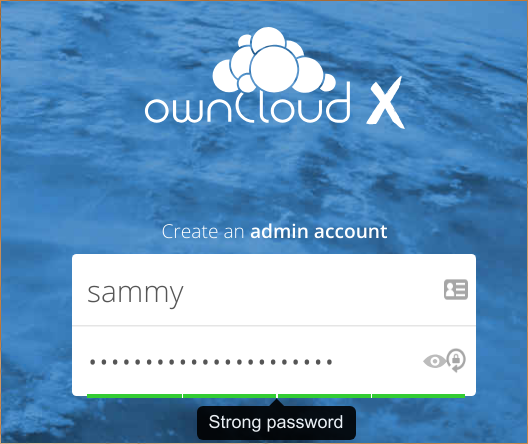

Next, leave the Data folder setting as-is and scroll down to the database configuration section.

Fill out the details of the database name, database username, and database password you created in the previous section. If you used the settings from this guide, both the database name and username will be owncloud. Leave the database host as localhost:
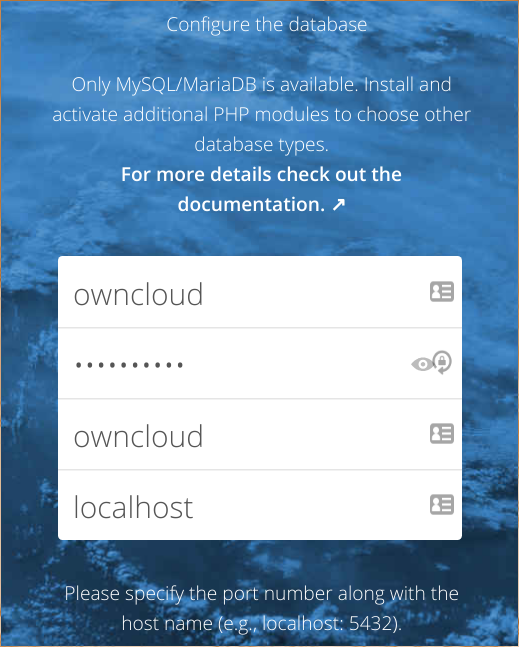

Click the Finish setup button to finish configuring ownCloud using the information you’ve provided. You will be taken to a login screen where you can sign in using your new account:
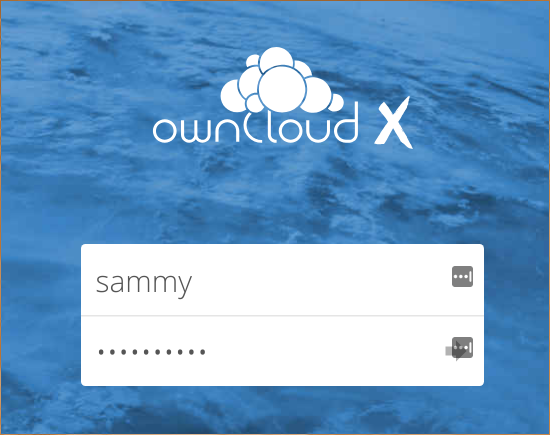

On your first login, a screen will appear where you can download applications to sync your files on various devices. You can download and configure these now or do it at a later time. When you are finished, click the x in the top-right corner of the splash screen to access the main interface:
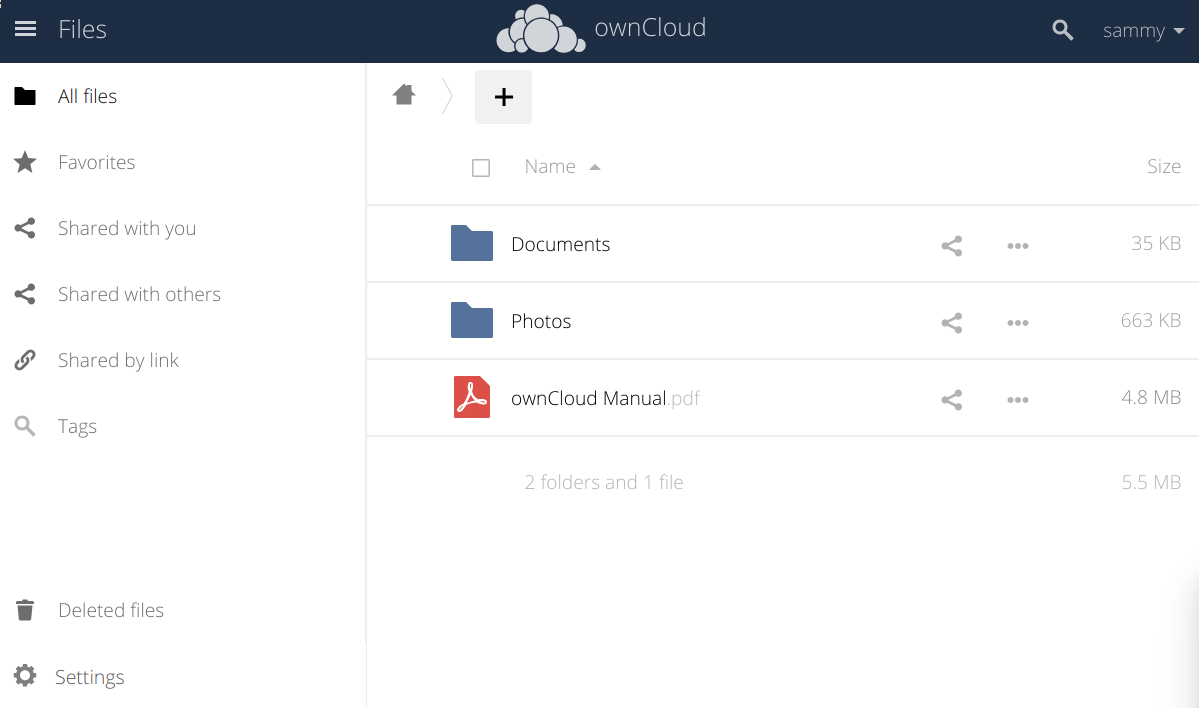

Here, you can create or upload files to your personal cloud.

Conclusion
ownCloud can replicate the capabilities of popular third-party cloud storage services. Content can be shared between users or externally with public URLs. The advantage of ownCloud is that the information is stored in a place that you control and manage without a third party.

Sunday, 14 February 2021

Cara Install Mail Server di Ubuntu 20.04

Cara menginstal dan mengkonfigurasi Mail server di Ubuntu Server 20.04 menggunakan Postfix dan dovecot serta mengaktifkan SSL Certificate pada mail server. Sebelumnya pastikan rekan-rekan sudah mempunyai DNS, jika belum lihat pada link dibawah ini.

1. Installasi Postfix & Dovecot
Tahap pertama yang akan kita lakukan adalah menginstall Postfix dan Dovecot, untuk installsi postfix dan dovecot jalankan perintah berikut ini.root@mail:~# apt -y install postfix sasl2-bin dovecot-core dovecot-pop3d dovecot-imapd

Pada pilihan mail configuration pilih No configuration


2. Konfigurasi Postfix
Sebelum kita konfigurasi postfix ada baiknya kita backup terlebih dahulu file utama postfix yaitu file main.cf silahkan jalankan perintah berikut untuk backup file main.cf.root@mail:~# cp /usr/share/postfix/main.cf.dist /etc/postfix/main.cf root@mail:~# vi /etc/postfix/main.cf
Pada halaman vi ketik : set number untuk menampilkan Number lalu Edit pada bagian bagian dibawah ini
78 mail_owner = postfix 94 myhostname = mail.aspal.com 102 mydomain = aspal.com 123 myorigin = $mydomain 137 inet_interfaces = all 185 mydestination = $myhostname, localhost.$mydomain, localhost, $mydomain 228 local_recipient_maps = unix:passwd.byname $alias_maps 270 mynetworks_style = subnet 287 mynetworks = 127.0.0.0/8, 192.168.22.0/24 407 alias_maps = hash:/etc/aliases 418 alias_database = hash:/etc/aliases 440 home_mailbox = Maildir/ 576 #smtpd_banner = $myhostname ESMTP $mail_name (Ubuntu) 577 smtpd_banner = $myhostname ESMTP 650 sendmail_path = /usr/sbin/postfix 655 newaliases_path = /usr/bin/newaliases 660 mailq_path = /usr/bin/mailq 666 setgid_group = postdrop 670 #html_directory = 674 #manpage_directory = 679 #sample_directory = 683 #readme_directory =
Tambahkan pada bagian baris akhir
# limit email size 10M message_size_limit = 10485760 mailbox_size_limit = 1073741824 # SMTP-Auth setting smtpd_sasl_type = dovecot smtpd_sasl_path = private/auth smtpd_sasl_auth_enable = yes smtpd_sasl_security_options = noanonymous smtpd_sasl_local_domain = $myhostname smtpd_recipient_restrictions = permit_mynetworks, permit_auth_destination, \ permit_sasl_authenticated, reject
Simpan perubahan
root@mail:~# newaliases
Restart posftix
root@mail:~# systemctl restart postfix

3. Konfigurasi Dovecot
Dovecot adalah server IMAP dan POP3 open-source untuk sistem operasi mirip Unix, yang ditulis terutama dengan mempertimbangkan keamanan. Bagian ini menjelaskan cara mengaturnya sebagai server IMAP atau POP3.
Edit file dovecot.conf
root@mail:~# vi /etc/dovecot/dovecot.conf # line 30: uncomment listen = *, ::
Edit file 10-auth.conf
root@mail:~# vi /etc/dovecot/conf.d/10-auth.conf # line 10: uncomment and change ( allow plain text auth ) disable_plaintext_auth = no # line 100: add auth_mechanisms = plain login
Edit file 10-mail.conf
[root@srv1 ~]# vi /etc/dovecot/conf.d/10-mail.conf # line 30: change to Maildir mail_location = maildir:~/Maildir
Edit file 10-master.conf
root@mail:~# vi /etc/dovecot/conf.d/10-master.conf # line 96-98: uncomment and add # Postfix smtp-auth unix_listener /var/spool/postfix/private/auth { mode = 0666 user = postfix group = postfix }
Restart Dovecot
root@mail:~# systemctl restart dovecot

4. SSL Certificate
Selanjutnya kita akan membuat Self sign Certificate jalankan perintah berikut.
root@mail:/home/kris# openssl req -x509 -nodes -days 365 -newkey rsa:2048 -keyout /etc/ssl/private/sertificate.key -out /etc/ssl/certs/sertificate.crt Generating a RSA private key ................+++++ .............................+++++ writing new private key to '/etc/ssl/private/sertificate.key' ----- You are about to be asked to enter information that will be incorporated into your certificate request. What you are about to enter is what is called a Distinguished Name or a DN. There are quite a few fields but you can leave some blank For some fields there will be a default value, If you enter '.', the field will be left blank. ----- Country Name (2 letter code) [AU]:IN State or Province Name (full name) [Some-State]:Indonesia Locality Name (eg, city) []:Jakarta Organization Name (eg, company) [Internet Widgits Pty Ltd]:PT.Nama_pt Organizational Unit Name (eg, section) []:sysadmin Common Name (e.g. server FQDN or YOUR name) []:aspal.com Email Address []:sysadmin@aspal.com root@mail:/home/kris#

Certificate akan masuk pada direktori /etc/ssl/certs dan /etc/ssl/private

Edit file postfix main.cf
root@mail:~# vi /etc/postfix/main.cf
Lalu tambahkan pada bagian akhir
# add Certificate smtpd_use_tls = yes smtp_tls_mandatory_protocols = !SSLv2, !SSLv3 smtpd_tls_mandatory_protocols = !SSLv2, !SSLv3 smtpd_tls_cert_file = /etc/ssl/certs/sertificate.crt smtpd_tls_key_file = /etc/ssl/private/sertificate.key smtpd_tls_session_cache_database = btree:${data_directory}/smtpd_scache
Edit file master.cf
root@mail:~# vi /etc/postfix/master.cf # line 17-21: uncomment like follows submission inet n - y - - smtpd -o syslog_name=postfix/submission # -o smtpd_tls_security_level=encrypt -o smtpd_sasl_auth_enable=yes -o smtpd_tls_auth_only=yes
Edit file 10-ssl.conf
root@mail:~# vi /etc/dovecot/conf.d/10-ssl.conf # line 6: ganti ssl = yes # line 12,13: uncomment dan masukan direktori penyimpanan certificates ssl_cert = </etc/ssl/certs/sertificate.crt ssl_key = </etc/ssl/private/sertificate.key
Restart service postfix dan dovecot
root@mail:~# systemctl restart postfix dovecot
Tambahkan beberapa user dengan perintah
root@mail:~# adduser user1 root@mail:~# passwd user1

5. Pengetesan
Testing menggunakan Mozila Thunderbird pada Client Windows


Testing menggunakan Mozila Thunderbird pada Client Ubuntu


Tesing Kirim Email


Email diterima di Client Windows


Balas Email


Email diterima


Cara Install Samba di Ubuntu Server 20.04

Samba adalah program yang bersifat Opensource yang memungkinkan untuk berbagi file yang dibagikan di kedua sistem windows dan linux. Jadi dengan menggunakan Samba, kedua sistem dapat berbagi file, printer dan folder melalui jaringan.
Samba Server merupakan sebuah protokol yang dikembangkan di Sistem Operasi Linux untuk melayani permintaan pertukaran data antara mesin Ms. Windows dan Linux.
Disamping untuk melayani file sharing antara Windows dan Linux, Samba juga merupakan salah satu protokol yang digunakan di Sistem Operasi Linux untuk melayani pemakaian data secara bersama-sama.
Apa kira-kira yang menjadi dasar pengembangan Samba? Sebenarnya yang menjadi dasar dari pengembangan Samba adalah protokol SMB yang merupakan singkatan dari Server Message Block yang merupakan protokol standard yang dikeluarkan oleh Microsoft yang digunakan oleh Windows. Fungsi SMB dalam Windows adalah sebagai protokol yang digunakan untuk membagi data, baik dari perangkat CD-ROM, hard disk, maupun perangkat keluaran seperti printer dan plotter untuk dapat digunakan bersama-sama.

Berikut adalah beberapa pengertian dari SAMBA :
  1. Samba adalah program yang dapat menjembatani kompleksitas berbagai platform system operasi Linux(UNIX) dengan mesin Windows yang dijalankan dalam suatu jaringan komputer. Samba merupakan aplikasi dari UNIX dan Linux, yang dikenal dengan SMB(Service Message Block) protocol. Banyak sistem operasi seperti Windows dan OS/2 yang menggunakan SMB untuk menciptakan jaringan client/server. Protokol Samba memungkinkan server Linux/UNIX untuk berkomunikasi dengan mesin client yang mengunakan OS Windows dalam satu jaringan.
  2. Samba adalah sebuah software yang bekerja di sistem operasi linux, unix dan windows yang menggunakan protokol network smb (server massage block). Smb adalah sebuah protokol komunikasi data yang juga digunakan oleh Microsoft dan OS/2 untuk menampilkan fungsi jaringan client-server yang menyediakan sharing file dan printer serta tugas-tugas lainnya yang berhubungan.

Perbedaan smbd dengan nmbd

Sebenarnya Samba disusun atas dua damon, yatu smbd dan nmbd. Smbd adalah daemon yang secara nyata menangani servis sharing file sistem dan printer untuk klien. Pada saat sebuah klien melakukan autentikasi, smbd akan membuatkan duplikat dirinya, bagian asli akan kembali ke port 139 untuk mendengarkan permintaan baru dan bagian duplikat menangani koneksi terhadap klien. Dulikat ini juga mengubah ID user efektifnya dari root ke user yang terautentikasi. Misalnya , kalau user “wafi” melakukan autentikasi dengan smbd, duplikat baru akan berjalan dengan permisi “wafi”, dan bukannya permisi “root”). Duplikat ini akan berada di memory selama masih terkoneksi dengan klien.
Daemon nmbd bertanggung-jawab untuk menangani permintaan server name NetBIOS. Ia akan mendengarkan port 137, tidak seperti smbd, nmbd tidak membuat contoh dirinya untuk menangani setiap pertanyaan. Kedua daemon
Selain 2 daemon utama di atas, aplikasi samba juga mempunyai beberapa program pendukung yaitu :
  1. smbclient, aplikasi di klien dengan tampilan mirip ftp untuk mengakses SMB resource share (mengakses share files)
  2. smbtar, Program yang memback up data yang dishare. Mirip tar di Linux.
  3. Nmblookup, Program yang membantu mencari nama (names lookup) dengan memanfaatkan NetBIOS over TCP/IP. Nmblookup dapat digunakan untuk meresolve dari nama komputer ke nomor IP dan sebaliknya.
  4. smbpasswd, Program yang memungkinkan administrator mengatur password yang terenkripsi yang dipergunakan oleh Samba Server.
  5. Smbstatus, Program yang memonitor status terakhir dari share resources yang diberikan oleh Server Samba.
  6. Testparm, Program kecil untuk melakukan proses debug (memeriksa parameter) terhadap file konfigurasi Samba (smb.conf)
  7. Swat, Samba Web Administration Tool, program bantu yang memberikan interface model web untuk mengadministrasi Samba. SWAT mempermudah edit smb.conf (file konfigurasi Samba) mengatur resource share, melihat status Samba terakhir, dengan dukungan file help yang sangat bermanfaat.

Fungsi dari Samba Server

  1. Menghubungkan antara mesin Linux (UNIX) dengan mesin Windows. Sebagai perangkat lunak cukup banyak fungsi yang dapat dilakukan oleh samba software, mulai dari menjembatani sharing file, sharing device, PDC, firewall, DNS, DHCP, FTP, webserver, sebagai gateway, mail server, proxy dan lain-lain. Fasilitas pengremote seperti telnet dan ssh juga tersedia. Salah satu keunggulan lainnya adalah adanya aplikasi pengaturan yang tidak lagi hanya berbasis teks, tetapi juga berbasis grafis yaitu swat. Menempatkan masin Linux/UNIX sebagai PDC (Primary Domain Controller) seperti yang dilakukan oleh NT dalam jaringan Wondows.
  2. Samba PDC (Primary Domain Controller) bertujuan sebagai komputer yang akan melakukan validasi user kepada setiap client yang akan bergabung dalam satu domain tertentu, dengan kata lain hanya user yang terdaftar yang diijinkan masuk ke domain tersebut dan mengakses semua fasilitas domain yang disediakan.
  3. Dapat berfungsi sebagai domain controller pada jaringan Microsoft Windows.

Keunggulan SAMBA

  1. Gratis atau free
  2. Tersedia untuk berbagai macam platform
  3. Mudah dikonfigurasi oleh administrator
  4. Sudah terhubung langsung dengan jaringan
  5. Mudah dikonfigurasi sesuai dengan kebutuhan administrator
  6. Mempunyai performa yang maksimal.
  7. dan jarang ditemui masalah dalam penggunaannya di  jaringan
  8. Dapat diandalkan karena jarang terjadi kesalahan.

Pada tutorial kali ini, sobat akan belajar cara menginstal dan mengkonfigurasi Samba di Ubuntu server 12.04. sobat juga akan belajar cara membuat folder yang dapat diakses bersama dan membuat folder yang dapat diakses hanya user tertentu saja.

Installasi Samba
Buka terminal lalu login sebagai root user lalu masukan perintah berikut.
root@srv1:~# apt install samba

Konfigurasi
File konfigurasi Samba utama terletak di /etc/samba/smb.conf silahkan backup file utama samba sebelum kita membuat perubahan. jalankan perintah berikut.root@srv1:~# cp /etc/samba/smb.conf /etc/samba/smb.conf.ori

Membuat Folder Bersama
Selanjutnya kita akan membuat Folder yang dapat di akses untuk semua User
root@srv1:~# mkdir -p /srv/samba/share root@srv1:~# chown nobody:nogroup /srv/samba/share/
Buka file smb.conf
root@srv1:~# nano /etc/samba/smb.conf
Lalu Tambahkan pada baris bagian bawah
[Folder_Bersama] comment = File Sharing untuk bersama path = /srv/samba/share browsable = yes guest ok = yes read only = no create mask = 0755
Simpan perubahan lalu restart service samba
root@srv1:~# systemctl restart smbd.service nmbd.service

Untuk pengetesan silakan dari Client windows jalankan perintah \\[IP Address Server]


Untuk pengetesan dari Client Ubuntu jalankan perintah smb://[IP Address Server] lalu Klik Connect


Membuat Folder untuk User Group
Selanjutnya kita akan membuat Sebuah Folder yang hanya bisa diakses oleh Group. sebagai contoh disini saya akan membuat group bernama sales yang nantinya hanya akan bisa diakses oleh user yang berada pada group sales.Sebelumnya kita install paket-paketnya, jalankan perintah berikut.
kris@srv1:~$ sudo apt install libpam-winbind
Pertama kita buat group untuk sales
kris@srv1:~$ sudo addgroup smbsales
Lalu kita membuat user baru untuk group sales disini saya membuat dua user yaitu bob dan jane
kris@srv1:~$ sudo useradd bob kris@srv1:~$ sudo passwd bob New password: masukan password Retype new password: masukan password passwd: password updated successfully
kris@srv1:~$ sudo useradd jane kris@srv1:~$ sudo passwd jane New password: masukan password Retype new password: masukan password passwd: password updated successfully
Selanjutnya kita tambahkan user ke dalam group smbsales
kris@srv1:~$ sudo usermod -a -G smbsales bob kris@srv1:~$ sudo usermod -a -G smbsales jane
Cek di direktori group apakah user sudah berada pada group smbsales
kris@srv1:~$ cat /etc/group mysql:x:124: winbindd_priv:x:125: smbsales:x:1002:bob,jane
Selanjutnya kita akan membuat password untuk user samba
kris@srv1:~$ sudo smbpasswd -a bob New SMB password: masukan password Retype new SMB password: masukan password Added user bob.
kris@srv1:~$ sudo smbpasswd -a jane New SMB password: masukan password Retype new SMB password: masukan password Added user jane.
Selanjutnya kita buat direktori untuk Group Sales
kris@srv1:~$ sudo mkdir -p /srv/samba/sales
Selanjutnya memberikan ijin agar user root dan group sales saja yang dapat mengakses Folder sales
kris@srv1:~$ sudo chown -R root:smbgroup /srv/samba/sales kris@srv1:~$ sudo chmod -R 0770 /srv/samba/sales
Selanjutnya Edit file smb.conf
kris@srv1:~$ sudo nano /etc/samba/smb.conf
Lalu masukan pada baris paling bawah
[Folder_sales] comment = Ubuntu File Sharing Group Sales path = /srv/samba/sales valid users = @smbsales browsable = yes guest ok = no writable = yes
Simpan perubahan lalu restart service samba
kris@srv1:~$ sudo systemctl restart smbd.service nmbd.service

#nano /etc/samba/smb.conf

Tambahkan lah tulisan di paling bawah dari file tersebut.
[samba1]
comment = folder ini milik samba1
path =  /home/samba1/
valid users = samba1  
browseable = yes      
public = no         
writable = yes        

[samba2]             
comment = folder ini milik samba2
path = /home/samba2/
valid users = samba2
browseable = yes
public = no
writable = yes

[hrd]
comment = hanya bisa read only tidak bisa di tulis, di edit ataupun dihapus
path = /home/hrd/
browseable = yes
writable = no
valid users = samba1 samba2
admin users = root

[gudang]
comment = hanya bisa read only tidak bisa di tulis, diedit ataupun dihapus
path = /home/gudang/
direktori samba di home
browseable = yes
writable = no
valid users = samba1 samba2
admin users = root

Lebih jelasnya bisa dilihat seperti gambar dibawah ini


Kemudian setelah selesai jangan lupa tekan CTRL+X+Y,Enter untuk menyimpan semua perubahan, selanjutnya sobat lakukan perintah testparm untuk mengecek kesalahan parameter yang kita masukkan, ketikkan : testparm
# testparm
Setelah muncul tampilan seperti ini, Sobat kemudian Enter untuk melihat mengecek kesalahan parameter yang kita masukan
Kemudian restart paket samba server nya.
# service samba restart
Nah konfigurasi samba sudah selesai, sekarang sobat tinggal melakukan test akses menggunakan user samba1 dan samba2 di explorer.

Pengetesan
Untuk pengetesan silakan dari Client windows jalankan perintah \\[IP Address Server] untuk mengakses Folder Sales. Klik Folder sales lalu masukan user dan password user sales.


Testing buat folder baru di dalam Folder Sales


Untuk pengetesan silakan dari Client Ubuntu jalankan perintah smb://[IP Address Server] untuk mengakses Folder Sales. Klik Folder sales lalu masukan user dan password user sales.


Folder baru yang sebelumnya dibuat


Thursday, 11 February 2021

How to Configure an FTP Server on FreeNAS

FreeNAS is a powerful operating system to build customizable NAS solutions. With this tutorial we are going to see how to configure an FTP server to allow a user or a group of users to store and download data to/from the NAS.

The configuration will take a few minutes but it’s not as intuitive as it should be.
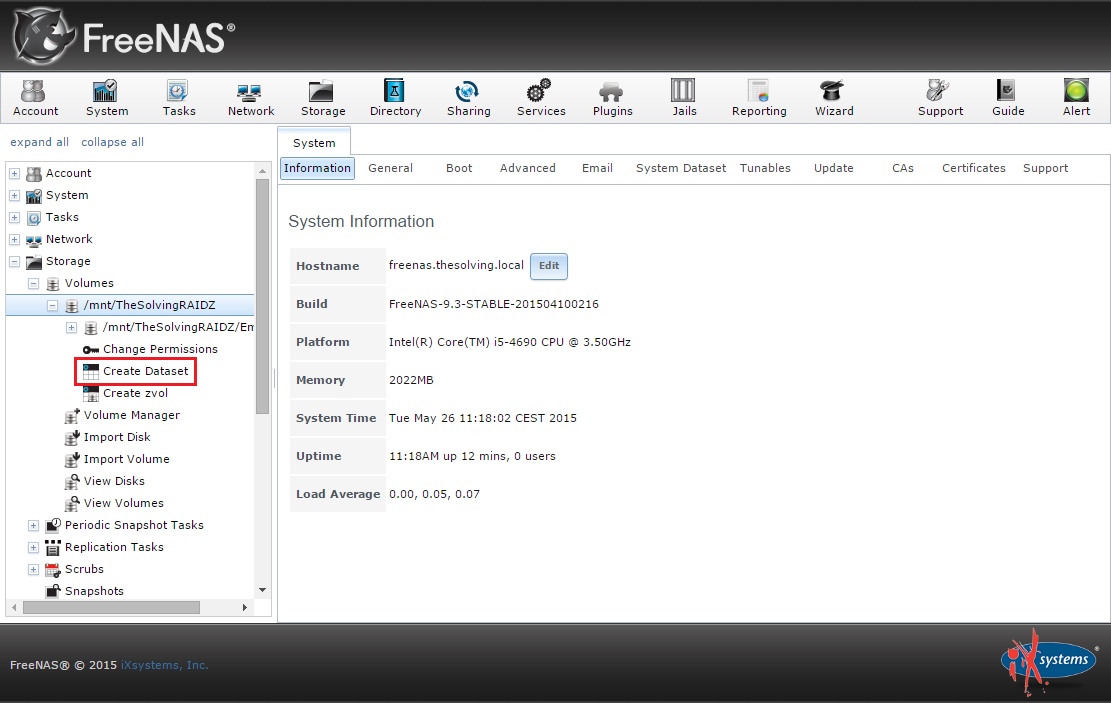
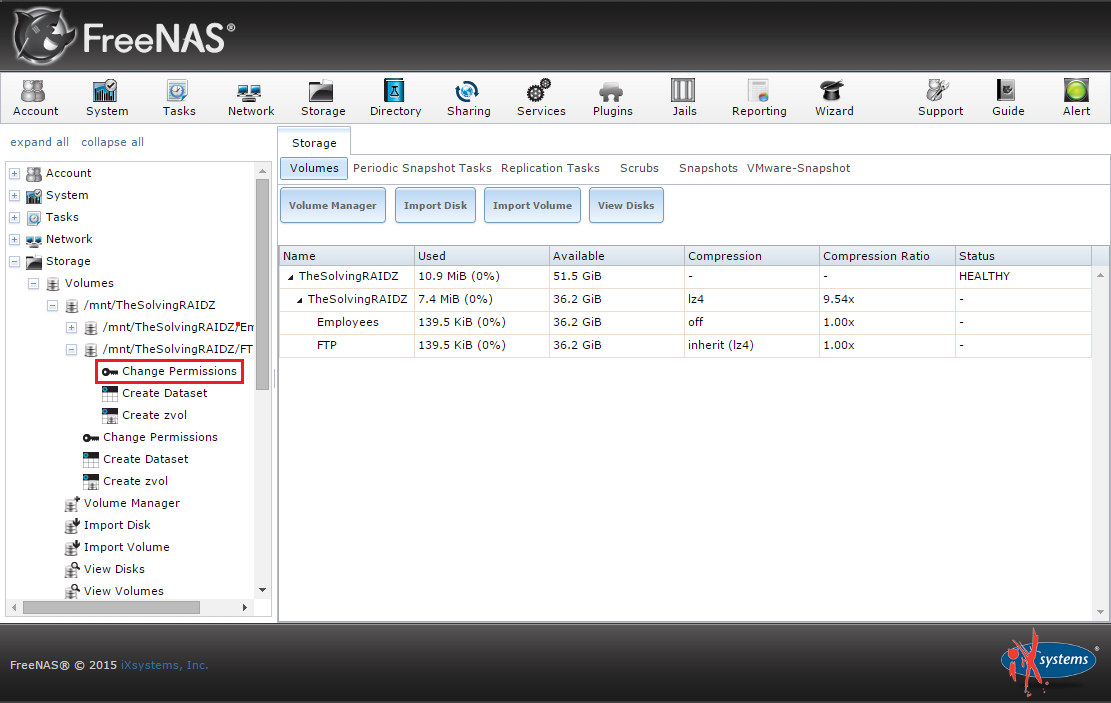
The first step is to create the Dataset we will share via FTP:


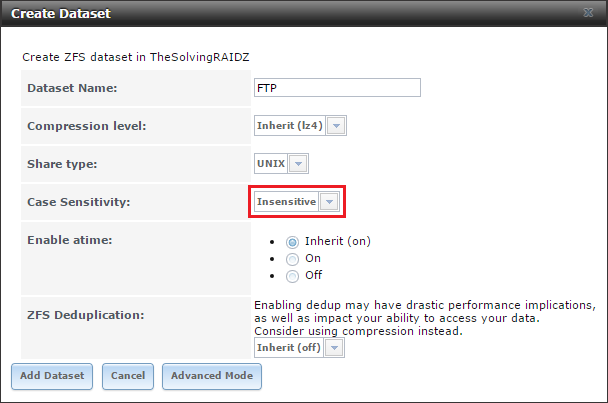
The configuration is straightforward, be careful to correctly set the Case Sensitivity:


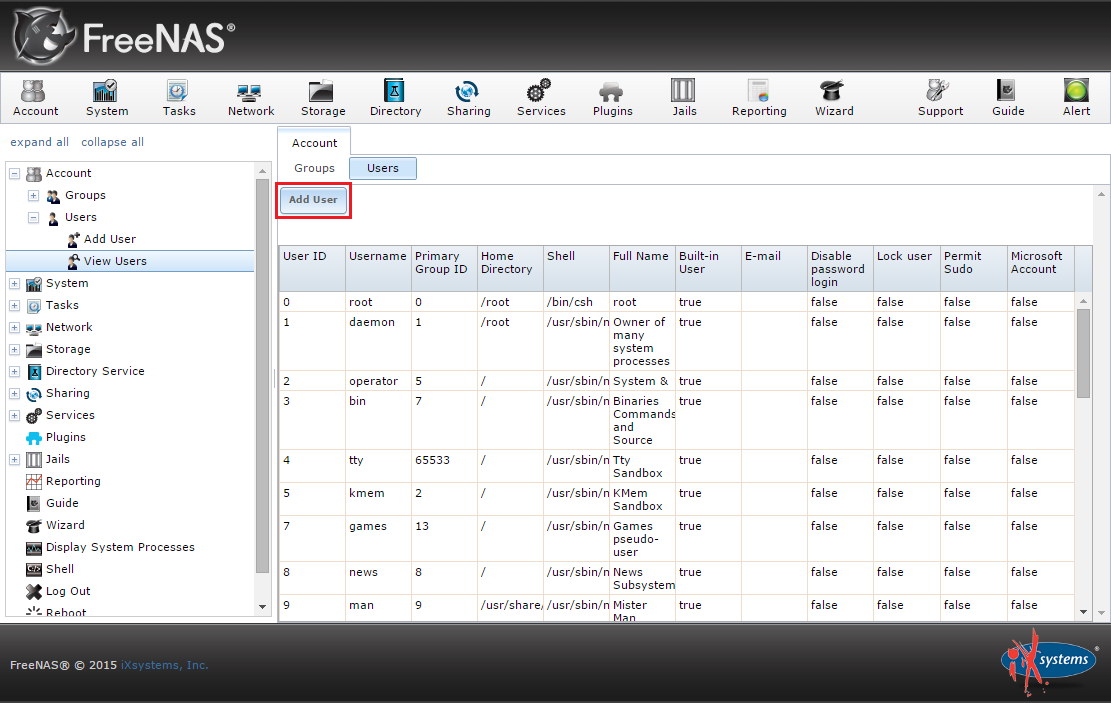
Go to the Users area and add a new user, the one able to access the FTP share:


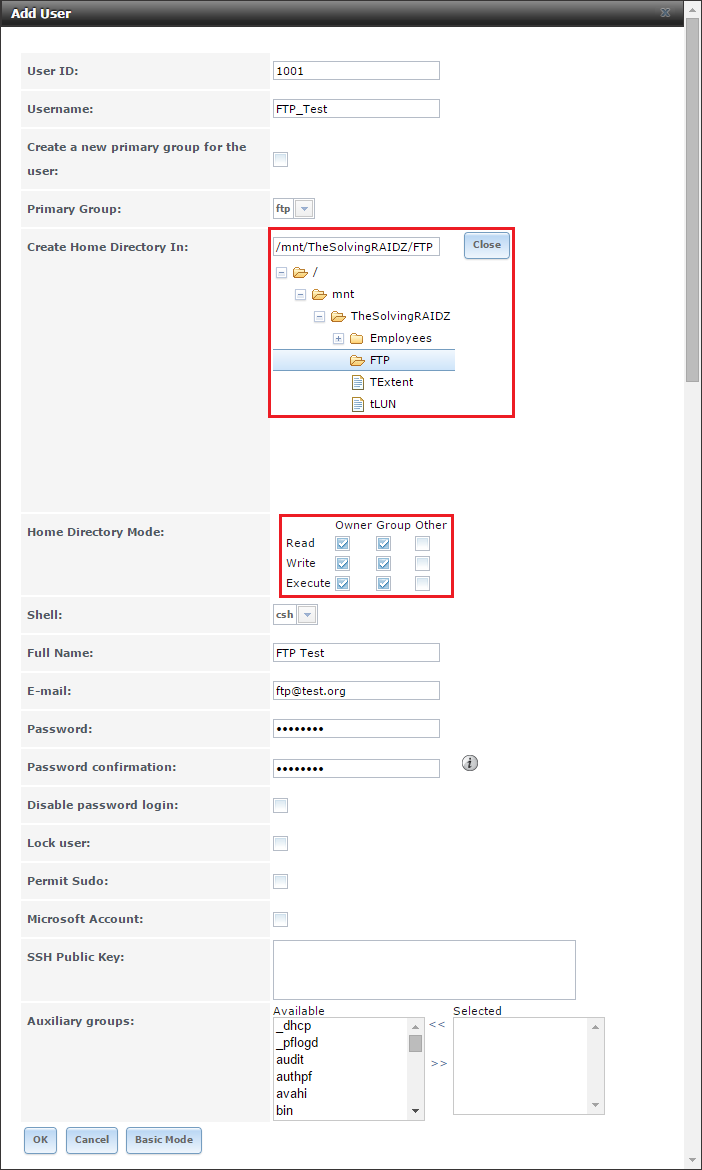
Assign as home the FTP folder:


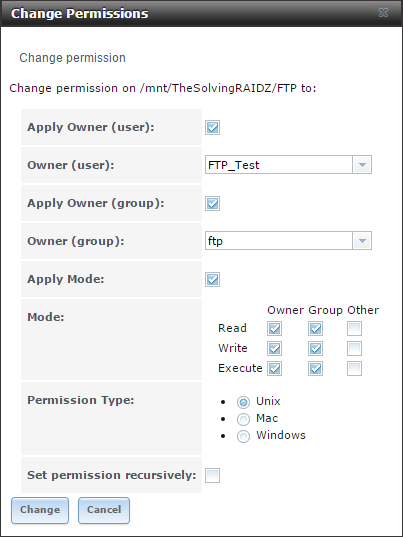
Assign to the user the write permissions to the FTP Dataset:


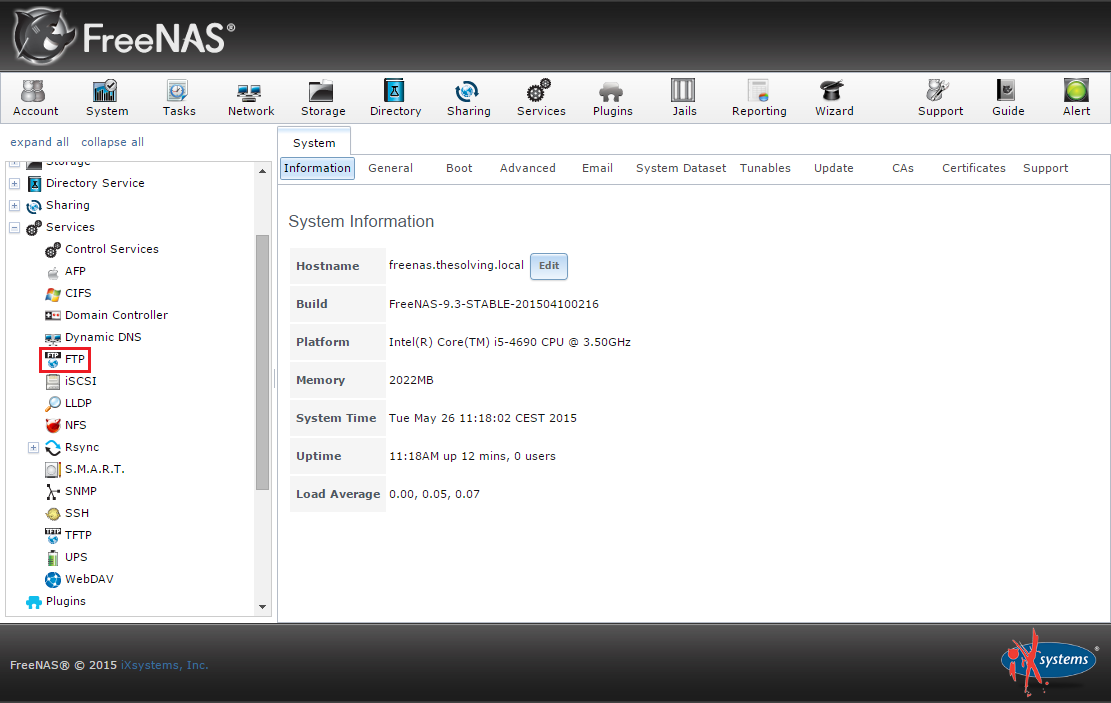
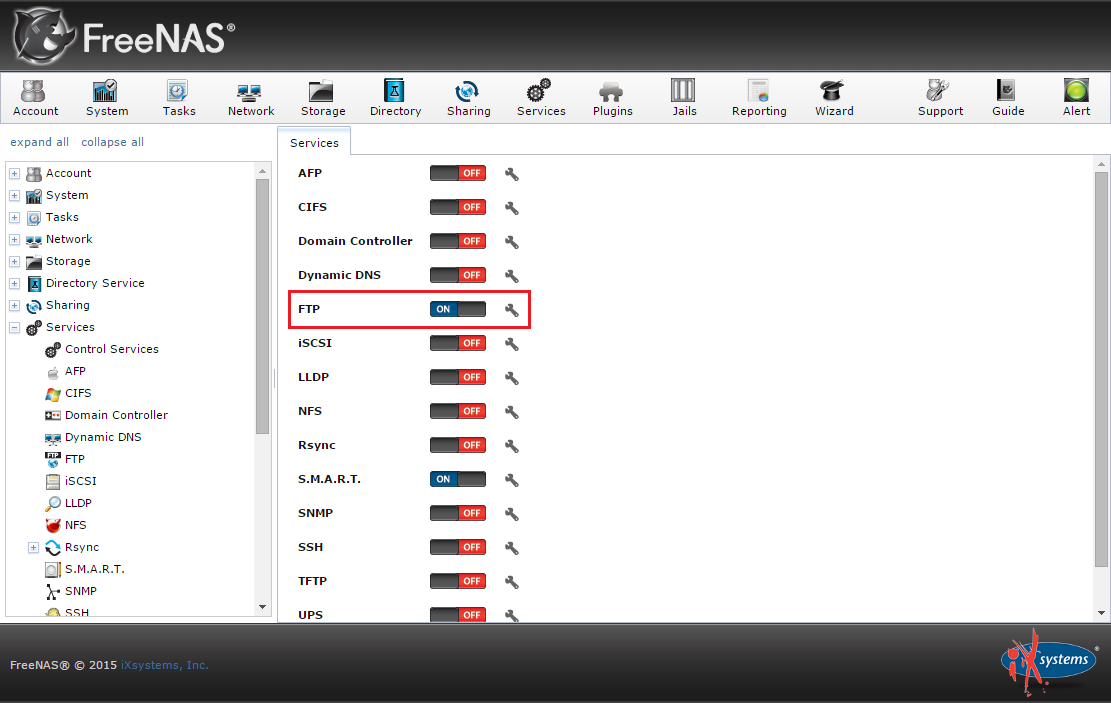
It’s time to configure and run the FTP server. Go to the Services area and click FTP:


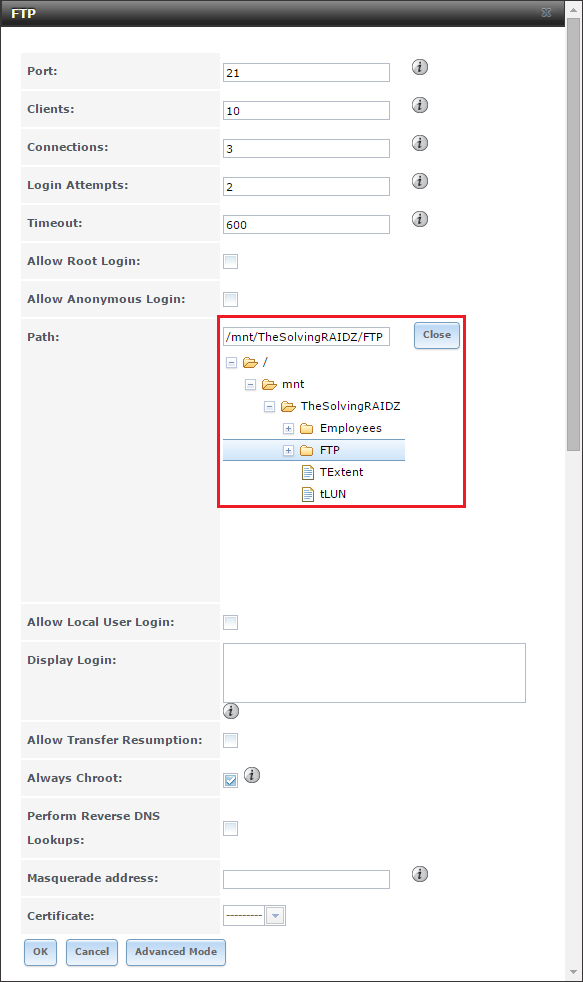
Select the FTP folder, then click Ok:


Enable the FTP service:


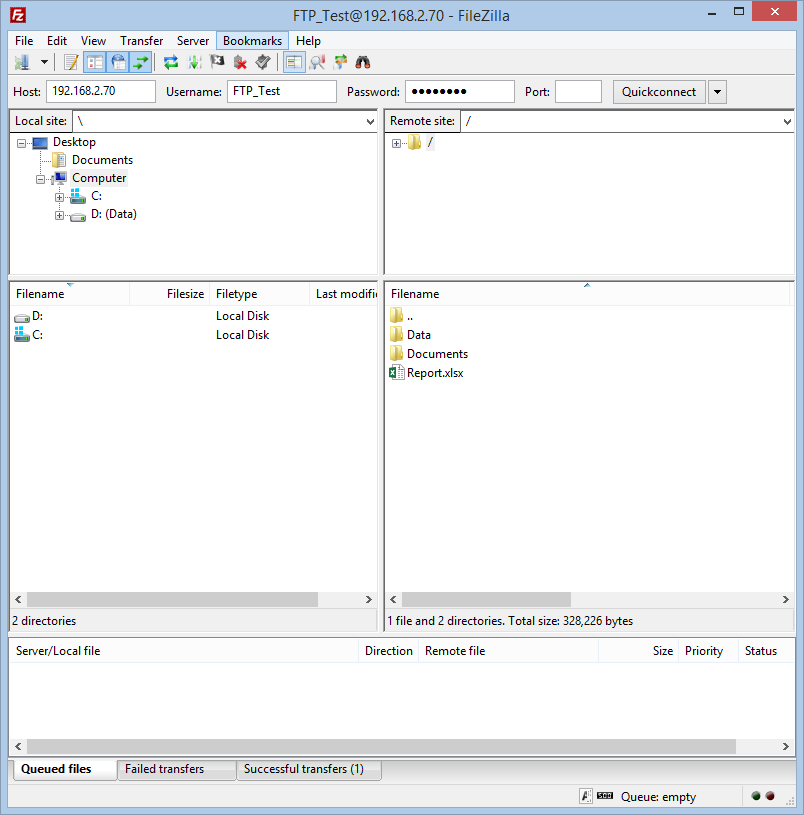
You’re ready to use the FTP server:

Integrating FreeNAS with Windows Active Directory

FreeNAS offers a powerful array of features and is adaptable to a wide range of network-attached storage solutions. We look at integrating Windows Active Directory, taking snapshots, replicating, and backing up.

Whether you need a network-attached storage (NAS) solution for your enterprise or small business or just want to build a storage solution for your Windows network, FreeNAS has got you covered.

In a previous issue [1], I showed you how to install FreeNAS, configure sharing, and set up a basic client node. In this article, I dive into more advanced features, such as integrating Windows Active Directory, snapshots, replication, and backup.
Directory Options

Your FreeNAS system [2] can easily integrate with your existing network directory services or use its own local user configuration. If you are running Windows Active Directory, LDAP (e.g., OpenLDAP), NIS (Network Information Service), or NT4 (I hope not!), you can pull the usernames and passwords directly from your directory. In this article, I focus on integrating your FreeNAS box with Windows Active Directory.

In this example, I am building on Windows 2012 R2, but you could build this many other ways. For example, if you have an open source environment, you might build this on Samba 4, which can provide much of the same technology.

Unlike the last installment on FreeNAS, in which I used a local FreeNAS authentication system, this time, I instead point the FreeNAS system to a Windows 2012 Active Directory server. This effectively means that I don't have to recreate users in FreeNAS; instead, I refer to Windows AD for authentication.

In this configuration, FreeNAS polls the Windows 2012 Active Directory domain controller and imports the users into FreeNAS. Keep in mind that FreeNAS also supports being a domain controller (DC) itself or being an additional DC alongside your others. Here, I use it for authentication only, not as a full active directory implementation.
Prerequisites

Before beginning, you must take care of a few prerequisites. To check your configuration in the web management interface, go to Network | Global Configuration (Figure 1). Double-check your network settings (IP, Gateway, etc.) and make sure the correct domain is listed and you are pointed at the correct DNS server. This is easily accomplished by going to the FreeNAS shell in the web GUI or the Console. In this case, assure you are pointing to your Active Directory (AD) domain controller.

Figure 1: Checking your configuration.

Next, you should go to your DNS server (which happens to be your AD domain controller as well) and add a DNS record for your FreeNAS box. Finally, test the name resolution and network availability from the shell on FreeNAS with ping or dig.

Network Time Protocol (NTP) synchronizes time on a network. Time is of vital importance to many services such as Kerberos and logging, among others. In this case, you want to assure both your Windows 2012 R2 server and FreeNAS box are pointing to the same NTP server. In FreeNAS, you can do so by going to System | General | NTP Servers .

If you are running an End-of-Support/End-of-Life version of any software, it is time to upgrade. Systems such as Windows NT4 to 2003 (end of life in 2015) or NIS are beyond antiquated, insecure technologies that should only be exhibited in museums.
Setting up AD Authentication

With the prerequisites out of the way, you are ready to begin. For this section, I assume you already have a basic FreeNAS setup that is using local authentication (FreeNAS local users/passwords) and you are reconfiguring it to use Windows Active Directory. Starting this process is simply accomplished by navigating in the FreeNAS web GUI to Directory | Active Directory (Figure 2). Simply put in your domain, AD administrator account and AD administrator password. When it finalizes, you will see a success message flash at the top of the FreeNAS screen.

Figure 2: Active Directory settings window.

Generally, you will be fine using the default option (non-advanced mode), but quite a few options are customizable by clicking the Advanced Mode button [3]. Once you have set up your FreeNAS box to use AD, you can go to your volumes and change the permissions as desired under Storage | View Volumes . Simply select the volume you want to manage and then click the Change Permissions icon. From there, you will see the usual options for assigning permissions.

Now that you have set your FreeNAS server with Active Directory, you can use a Windows client to test it. As you see in Figure 3 on a Windows 7 client joined to the domain, I'm able to connect to the share and enjoy the music (metal specifically) that I have stored there.

Figure 3: Streaming music after joining the domain.

Snapshots
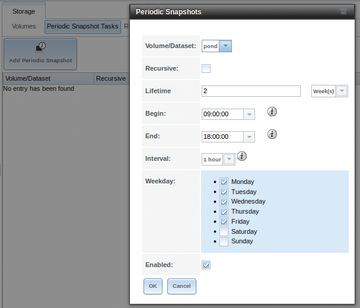
If you ever had to recover a deleted file or roll back to an older version, you'll love snapshot functionality. Once you set up snapshots, you can access files as they were from the point in time at which the snapshot was made. Previous snapshots can also be cloned and used to recover data from that snapshot in time. Snapshots can also be replicated (copied) to another remote system. With FreeNAS, you can do one-time snapshots or periodically scheduled them. In this case, I want to set up periodic or scheduled snapshots, so I go to the FreeNAS web interface and navigate to Storage | Volumes | Periodic Snapshot Tasks | Add Periodic Snapshot (Figure 4; Table 1).

Figure 4: Scheduling snapshots.

Table 1
Periodic Snapshot Options
SettingDescription
Volume/Dataset Select an existing ZFS volume, dataset, or zvol.
Recursive Check this box to take separate snapshots of the volume/dataset and each of its child datasets; if unchecked, only one snapshot is taken of the specified Volume/Dataset.
Lifetime How long to keep the snapshot on this system; if the snapshot is replicated, it is not removed from the receiving system when the lifetime expires.
Begin Do not create snapshots before this time.
End Do not create snapshots after this time.
Interval How often to take snapshots between Begin and End times.
Weekday Which days of the week to take snapshots.
Enabled Uncheck to disable the scheduled replication task without deleting it.

Select the lifetime and frequency of the snapshots based on your particular needs to schedule a snapshot at your specified time. It is important to note that snapshots are not the same as backups. Although snapshots are very powerful, they don't replace backups and a full disaster recovery plan. Now that you have scheduled snapshots, you replicate them to an off-site system. This process enhances your ability to recover and restore your most valuable asset: your data.

Replication
For increased fault tolerance, you want to replicate your ZFS dataset or pool to another server. Replication occurs over a secure SSH tunnel, which is an additional security benefit. For the sake of the example, you will have two nodes:
FreeNAS1 – The original FreeNAS server (PUSH)
FreeNAS2 – Your FreeNAS Secondary/Backup Server (PULL)

When setting up replication [4], the original server on which you created your snapshot is always the push server (FreeNAS1) and the server receiving the snapshots is the pull server (FreeNAS2). In my configuration, I have two FreeNAS boxes, but you could just as easily replicate to another Linux/Unix server with ZFS. The push and pull servers must each have a ZFS pool, and the push server must have a periodic snapshot task. SSH should be running on the pull server.

You will be using key-based authentication, so you first need to set up the pull configuration on the FreeNAS box. To assure SSH is up and running, visit Services | Control Services and click SSH to the ON position.

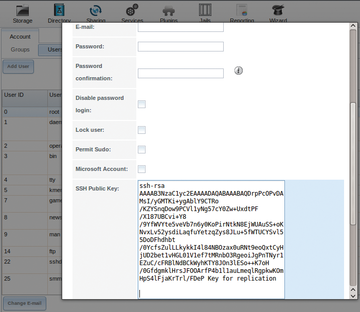
Next, navigate to Storage | Replication Tasks | View Replication Tasks | View Public Key to set up key-based authorization. On the PULL (FreeNAS2) machine, copy the contents of this public key and navigate to Account | Users | View Users . Click the Modify User button of the user you will be using for replication and paste in the copied key (Figure 5).

Figure 5: Adding the public key.

Before continuing, you should verify that your periodic snapshots are working by going to Storage | Replication Tasks | Add Replication Tasks . The Remote ZFS Volume/Dataset is the name of the ZFS filesystem on the remote side (the pull server), and the Remote hostname is the IP of the pull server. By default, replication occurs when a snapshot is created. Generally, you might want to schedule replication with the Begin and End times during non-peak working hours.

All other settings can accept the defaults unless your configuration requires something different. Now when you click SSH Key Scan , your push server will grab the SSH key for you. Finally, click OK : The screen should flash that the replication task was updated successfully.

Backup
Now that you have a share set up and your clients access it, you should plan some basic disaster recovery. A major part of this planning is having the proper backups in multiple places. In this case, you will set up both configuration and local data backups. Above and beyond that, I recommend you also do some form of encrypted offsite backup of your critical data either online, in the cloud, or at a secure storage facility.

FreeNAS natively supports many options for backup, including:
  • Bacula via a plugin
  • Almost any general backup software for a local backup to an external device
  • Backup to the cloud with CrashPlan
  • Backup to the cloud via any number of online backup SaaS services
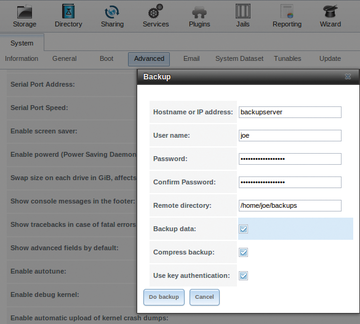
Given the many options, you have a lot of choice as to how to configure for fault tolerance and disaster recovery. To make your life a bit easier – just in case you have to recover your FreeNAS box – you should always back up your configuration, ZFS layout, and data. In the web interface, choose System | Advanced | Backup .

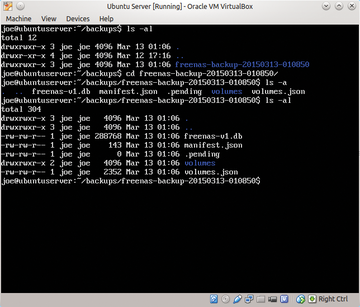
You will see the backup window in Figure 6. Fill this in with the required information for the target server to which you will backing up. Once you are done, simply click Do backup . To verify that the backup has taken place, look at the server you backed up to and see if it is there. As you can see in Figure 7, the metal music backed up as planned.


Figure 6: Getting ready to back up.

Figure 7: Metal music, FreeNAS configuration, and ZFS layout backed up!

This backs up your FreeNAS configuration, ZFS layout, and (if you so choose) your data. It occurs over an encrypted SSH connection to another server. This other backup server only needs to have an SSH daemon running and sufficient storage to save the data from your FreeNAS box. I highly recommend you use key-based authentication rather than just passwords everywhere. To do so, place your public key of the root user in ~root/.ssh/authorized_keys.

If you want more fault tolerance in your FreeNAS install, you can mirror the boot device. This means that whatever storage you use for the install (compact flash, USB flash drive, SSD, or regular SATA hard drive as the boot device), you need two of them so the install is mirrored. However, always remember that this doesn't magically back up your FreeNAS configuration if both drives should fail. You should still plan on backing up your data [5].

CrashPlan
CrashPlan [6] is a offsite cloud-based backup solution. It is one of the many FreeNAS plugins. Thanks to the FreeBSD jail system, you are able to run CrashPlan right on your FreeNAS box. FreeBSD jails allow you to isolate and compartmentalize your system. Built on the chroot concept, jails are essentially OS-level virtualization that allows you create a separate instance. Jails are isolated from the host as a virtual instance but share the same kernel. For the CrashPlan configuration here, you will be creating a jail in which it runs.

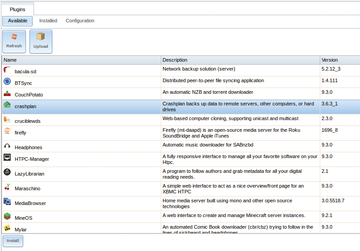
Getting CrashPlan installed and configured takes a few steps, but I will go through them in detail. First, on the FreeNAS server, go to Plugins , choose CrashPlan , and click Install to download and install the CrashPlan application to your FreeNAS box (Figure 8).
Figure 8: Installing the CrashPlan plugin.

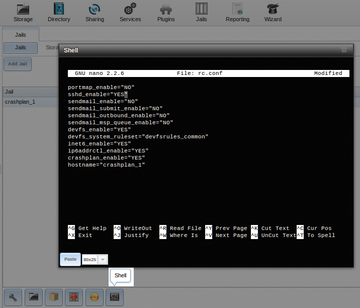
To configure the plugin, go to Jails | View Jails , then select your crashplan listed under Jail and click the Shell icon at the bottom of the screen (Figure 9). Edit /etc/rc.conf to enable SSHD by changing the sshd_enable line to "YES":sshd_enable="YES"

Next you need to create a new user who is a member of the wheel group via the console with Account | Users | Add User . Simply follow the questions and make sure to specify this user as a member of the wheel group.
Figure 9: Configuring your CrashPlan plugin.

Now that you have created a user, you should copy your public key (from the desktop) to the CrashPlan jail:ssh-copy-id crashplan@<ipaddressofjail>

Finally, create a tunnel to the CrashPlan jail with this SSH command:ssh -L 4200:127.0.0.1:4243 crashplan@<ipaddressofjail> -N -v -v

To be assured this is running, you can check withnetstat -na | grep LISTEN | grep 42

You should see the CrashPlan daemon running.
A CrashPlan Client on the Desktop
The CrashPlan configuration will be "headless" on FreeNAS, and the client will be on one of the desktops. On your desktop machine (mine is Linux), install the CrashPlan client:tar zxvf CrashPlan_3_7_0_Linux.tgz

Change into the CrashPlan install directory and run the install script:./sudo .install.sh

Once the script completes, edit your local CrashPlan configuration file ui.properties. The file is located in /usr/local/crashplan/conf/ui.properties. Uncomment and change your port to 4200.

Next go back to your FreeNAS box and visit Plugins | CrashPlan . Enable the CrashPlan plugin by moving the switch from the OFF position to ON.
Connecting to a Headless CrashPlan Jail

Now that the CrashPlan client is installed on your desktop and configured on the FreeNAS server, you can connect to it. First create a tunnel to the CrashPlan jail with the following SSH command:ssh -L 4200:127.0.0.1:4243 crashplan@<ipaddressofjail> -N -v -v

Now change to the directory where the CrashPlan client is installed and start up the client CrashPlanDesktop.

Configure a CrashPlan Backup Plan
This configuration does not provide a CrashPlan GUI on the FreeNAS box but, instead, lets the user run CrashPlan from another system (my Linux desktop in this case).

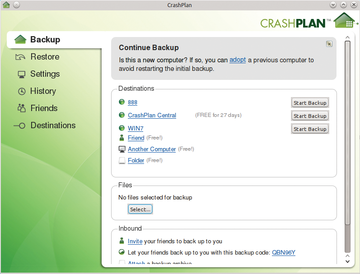
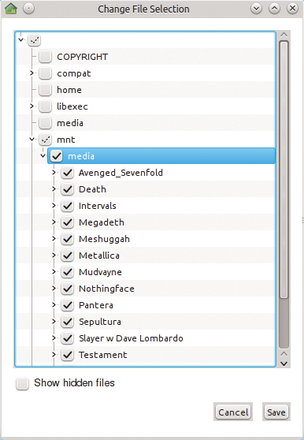
With the CrashPlan client up and running (Figure 10), you can configure your backups on your FreeNAS server. Simply select the files you would like to back up (Figure 11). Your CrashPlan client doesn't need to be running after you set up your backup plan.


Figure 10: The CrashPlan client.

Figure 11: Choosing the files to back up.

Conclusion
I hope this exploration of FreeNAS has been both interesting and fun. More importantly, I hope this introduction gives you the options to build whatever you need.
Open source is a powerhouse of innovation, and FreeNAS is a good example. So explore, have fun, and let me know what you build with this impressive and flexible storage platform.