Tutorial Social Network

Informasi Seputar Media Sosial

Tutorial Computer

Informasi Seputar Komputer

Tutorial Youtube

Informasi Seputar Youtube

Tutorial Blogger

Informasi Seputar Blogger

Tutorial Wordpress

Informasi Seputar Wordpress

Tutorial Website

Informasi Seputar Pemrograman Website

Tutorial Windows

Informasi Seputar Sistem Operasi Windows

Tutorial Linux

Informasi Seputar Sistem Operasi Linux

Tutorial Android

Informasi Seputar Android

Tuesday, 19 January 2021

A Picture Or An Object May Not Appear In A Word 2010 Or Word 2007 Document

Symptoms
When you open a Microsoft Office Word 2010 or Word 2007 document that contains a picture or an object, the picture or the object may not appear. This problem may occur in a document that contains a picture, a graphic image, an AutoShape object, or another object.

Cause
This problem occurs if you are using a Wrapping style option other than the In line with text option with the picture or with the object. And, one of the following conditions is true:
You are viewing the Word document in Draft view or in Outline view.
The Show drawings and text boxes on screen option is turned off.
The Print drawings created in Word option turned off.
The Use draft quality option is turned on.
If you are using the In line with text option with the picture or with the object, this problem may occur if the Picture Placeholders option is turned on.

This problem may also occur if you are experiencing a problem with the video driver.
Workaround
You are using a Wrapping style option other than the "In line with text" option
If you are using a Wrapping style option other than the In line with text option, use one of the following workarounds.

Use the "In line with text" Wrapping style option
To change the Wrapping style option for a picture or for an object to In line with text, follow these steps, as appropriate for your version of Word.

Word 2007
Click the picture or the object.
On the Format tab, click Text Wrapping in the Arrange group.
Click In line with text.

Word 2010
Click the picture or the object.
On the Format tab, click Text Wrapping in the Arrange group.
Click In line with text.
When you use the In line with text option, the picture or the object will be displayed in any view.

If you want to use a Wrapping style option other than the In line with text option, use one of the following workarounds.

Change the view
This problem may occur if you are viewing the document in Draft view or in Outline view. To work around this problem, view the document in one of the following views:
Print Layout
Full Screen Reading
Web Layout
Print Preview for Word 2007. For

Word 2010: Click File, and then click Print.
Word 2010 and Word 2007 documents consist of separate text and drawing layers. When you use a Wrapping style option other than the In line with text option with a picture or with an object, the picture or the object is inserted into the drawing layer. Word 2010 and Word 2007 do not display the drawing layer when you view the document in Draft view or in Outline view. The drawing layer is displayed in a Word 2010 and in a Word 2007 document when you use any one of the views that are mentioned in this workaround.

Turn on the "Show drawings and text boxes on screen" option
When you turn on the Show drawings and text boxes on screen option, you can view the picture or the object in Print Layout view or in Web Layout view. To turn on the Show drawings and text boxes on screen option, follow these steps, as appropriate for your version of Word.

Word 2007
Click the Microsoft Office Button, and then click Word Options.
Click Advanced.
Under Show document content, click to select the Show drawings and text boxes on screen check box.
Click OK.

Word 2010
Click File, and then click Options.
Click Advanced.
Under Show document content, click to select the Show drawings and text boxes on screen check box.
Click OK.

Turn on the "Print drawings created in Word" option
When you turn on the Print drawings created in Word option, you can view the picture or the object in Print Preview. And, you can print the picture or the object. To turn on the Print drawings created in Word option, follow these steps, as appropriate for your version of Word.

Word 2007
Click the Microsoft Office Button, and then click Word Options.
Click Display.
Under Printing options, click to select the Print drawings created in Word check box.
Click OK.

Word 2010
Click File, and then click Options.
Click Display.
Under Printing options, click to select the **Print drawings created in Word ** check box.
Click OK.

Turn off the "Use draft quality" option
When you turn off the Use draft quality option, you can view the picture or the object in Print Preview. And, you can print the picture or the object. To turn off the Use draft quality option, follow these steps, as appropriate for your version of Word.

Word 2007
Click the Microsoft Office Button, and then click Word Options.
Click Advanced.
Under Print, click to clear the Use draft quality check box.
Click OK.

Word 2010
Click File, and then click Options.
Click Advanced.
Under Print, click to clear the Use draft quality check box.
Click OK.
You are using the "In line with text" Wrapping style option
Turn off the "Picture Placeholders" option

When you turn off the Picture Placeholders option, you can view the picture or the object in all views. To turn off the Picture Placeholders option, follow these steps, as appropriate for your version of Word.

Word 2007
Click the Microsoft Office Button, and then click Word Options.
Click Advanced.
Under Display document content, click to clear the Picture Placeholders check box.
Click OK.

Word 2010
Click File, and then click Options.
Click Advanced.
Under Show document content, click to clear the Show Picture Placeholders check box.
Click OK.

Note
The Picture Placeholders option does not affect pictures or objects when you use a Wrapping style option other than the In line with text option. The Picture Placeholders option affects pictures and objects when you use the In line with text option in all views except the Full Screen Reading view.
You are experiencing problems with the video driver

If you experience this problem frequently, you may have a problem with the video driver settings or with the Windows Display Properties settings. If the previous workarounds do not resolve the problem, try the following workarounds.

Change the Color quality setting or the screen resolution of the current video driver
To change the color quality setting, follow these steps, as appropriate for your situation.
Windows XP
Click Start, click Run, type desk.cpl, and then click OK.
Click the Settings tab.
If the Color quality setting is set to Highest (32 bit), change this setting to Medium (16 bit), and then click OK.

If you are still experiencing the problem, change the screen resolution. To do this, follow these steps:
Click Start, click Run, type desk.cpl, and then click OK.
Click the Settings tab.
Under Screen resolution, move the slider to the left, and then click OK.

Windows Vista
Click Start, click Run, type desk.cpl, and then click OK.
If the Colors setting is set to Highest (32 bit), change this setting to Medium (16 bit), and then click OK.

If you are still experiencing the problem, change the screen resolution. To do this, follow these steps:
Click Start, click Run, type desk.cpl, and then click OK.
Under Resolution, move the slider to the left, and then click OK.

Windows 7
Click Start, click Run, type desk.cpl, and then click OK.
Click the Advanced Settings tab.
Click Monitor.

If Colors is set to Highest (32 bit), change this setting to Medium (16 bit), and then click OK.

If you are still experiencing the problem, change the screen resolution. To do this, follow these steps:
Click Start, click Run, type desk.cpl, and then click OK.
Under Resolution, click the arrow and try another resolution, and then click OK.

Change the hardware acceleration setting
Windows XP
Click Start, click Run, type desk.cpl, and then click OK.
On the Settings tab, click Advanced.
Click the Troubleshoot tab.
Move the slider to the left to reduce the hardware acceleration, and then click OK two times.
When you are asked if you want to restart the computer, click Yes.

Windows Vista and Windows 7
Click Start, click Run, type desk.cpl, and then click OK.
Click Advanced Settings.
Click the Troubleshoot.
If your display driver allows changes, click Change Settings. Move the slider to the left to reduce the hardware acceleration, and then click OK two times.
When you are asked if you want to restart the computer, click Yes.

Obtain an updated video card
If the workarounds that are described in this section help resolve this problem, contact your computer manufacturer for updated video drivers. If you have already upgraded your video card, contact the video card's manufacturer.

Monday, 18 January 2021

4 Cara Mengatasi Dokumen Microsoft Word 2016 yang Rusak

Seperti jenis berkas komputer pada umumnya, berkas dokumen Microsoft Word juga bisa rusak dikarenakan oleh berbagai sebab. Bisa karena virus, sistem yang bermasalah, prosedur mematikan komputer yang keliru atau sebab-sebab lainnya. Untuk mengatasi dokumen Word yang rusak, khususnya di Microsoft Word, ada 3 alternatif jalan keluar yang bisa ditempuh.

Cara Pertama
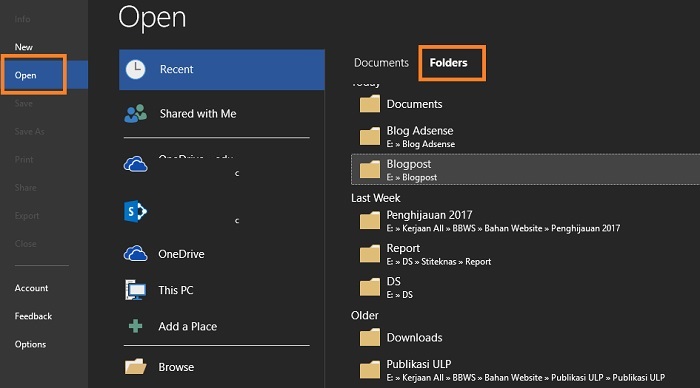
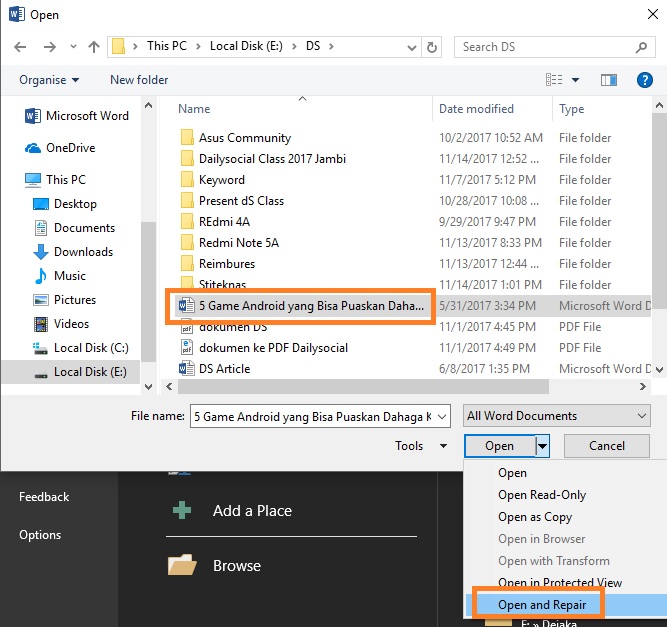
Menggunakan opsi Open and Repair yang secara default ada di hampir semua versi Office. Pertama-tama, jalankan aplikasi Microsoft Word dan buka dokumen kosong, atau langsung tekan tombol CTRL + O. Lalu carilah folder tempat berkas tersebut tersimpan. Ingat, harus folder di mana berkas tersimpan ya, bukan langsung klik dokumennya.


Tandai berkas yang rusak, kemudian klik tanda jarum tepat di sebelah tombol open agar muncul opsi lainnya, baru klik Open and Repair. Selanjutnya dokumen akan terbuka sebagai dokumen baru, silahkan disimpan kembali di tempat yang aman.


Cara Kedua
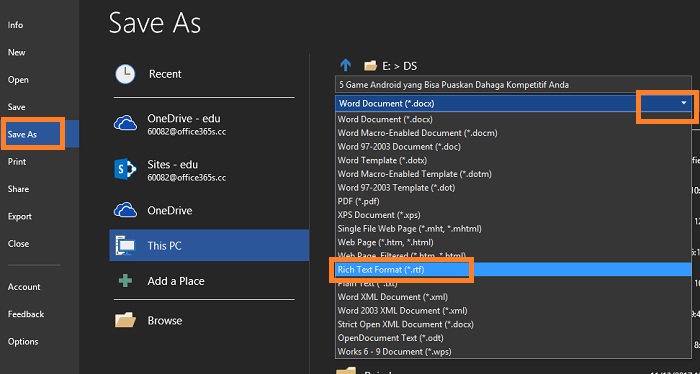
Buka dokumen yang rusak kemudian Save As ke dokumen yang berbeda, misalnya RTF, Web Page atau Plaint Text.
Setelah itu, buka kembali dalam format baru tersebut dan disimpan kembali (Save as) ke dalam format Word (docx).


Cara Ketiga: Dokumen Korup dan Tidak Bisa Dibuka
Cara ketiga ini ditempuh apabila dokumen Word 2016 Anda benar-benar tidak bisa dibuka.
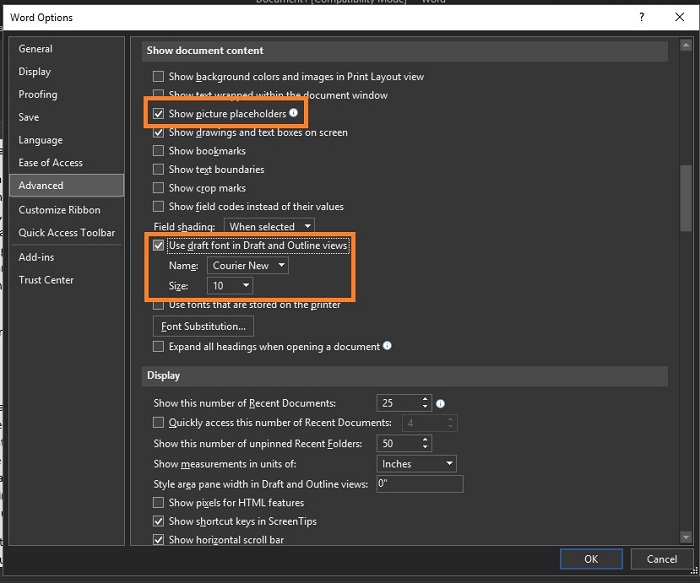
Buka dokumen kosong kemudian klik View – Draft.
Kemudian klik File – Options – Advanced. Scroll mouse ke opsi Show document content, centang opsi Show picture placeholders dan Use draft front in Draf and Outline views.


Terakhir klik OK dan coba buka kembali dokumen yang tidak bisa dibuka (korup).

Cara Keempat
Cara terakhir ini juga untuk kasus dokumen yang tidak bisa dibuka.
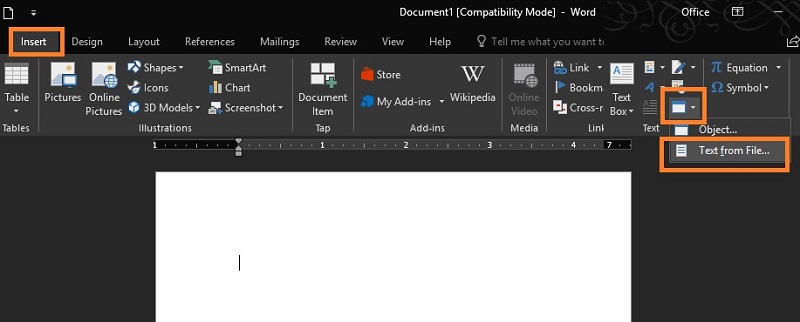
Buat dokumen kosong, kemudian klik Insert – Insert Object – Text from File.

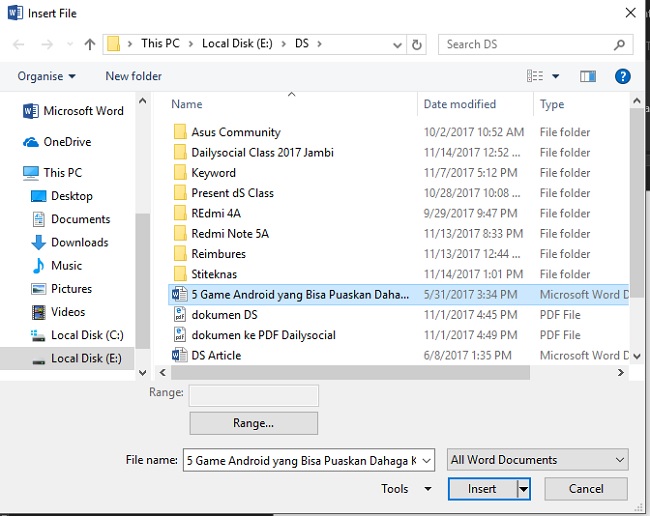
Saat muncul jendela explorer, tandai dokumen yang tidak bisa dibuka dan klik Insert.


Selesai, dokumen akan dimasukkan ke dalam dokumen baru tadi. Semoga tips ini bermanfaat, silahkan dicoba satu per satu.

Tips Mencegah Kerusakan Dokumen
  • Jangan mematikan komputer ketika dokumen sedang dalam kondisi terbuka. Simpan dan tutup jendela dokumen secara berurutan sebelum mematikan komputer. Kecuali jika mati lampu secara tiba-tiba dan komputer ikut mati.
  • Jangan lupa untuk secara berkala memindai kesehatan komputer dari berbagai virus dan malware.
  • Hati-hati saat menghubungkan perangkat flash disk ke komputer, pastikan perangkat tersebut dalam kondisi bersih.
  • Buatlah cadangan data di perangkat eksternal lainnya atau memanfaatkan penyimpanan berbasis cloud.
  • Selalu gunakan versi Office yang sama atau yang lebih baru saat melakukan pembaruan isi.

Enable Multiple Remote Connections on Windows Server

Windows Server 2012:
Please refer to the following steps to enable multiple remote connections on windows server 2012:

1. Login to the windows server 2012 via. RDP
2. Open command prompt. Type gpedit.msc and open Local Group Policy Editor.
3. Go to computer configuration --> Administrative Tempalates --> Wondows Components --> Remote Desktop services --> Remote Desktop Session Host --> Connections.
4. Search for "Restrict Remote Desktop Services users to a single Remote Desktop Services session"
5. Right click on it and click Edit.
6. Select the option of "Disabled", apply and click Ok.
7. Go to the command prompt and type "gpupate" and enter.

It will update the policy and following will be the result:
Computer Policy update has completed successfully.
User Policy update has completed successfully.

Windows Server 2008:
You need to follow the below steps on a Windows 2008 server in order to enable multiple remote connections :

1. Go to Start --> Run
2. Type in tsconfig.msc
3. Click OK
4. Un-check the box which says, "Restrict each user to a single session". 5. Click OK

Cara Mempercepat Windows 10 Laptop dan PC

Cara Mempercepat Windows 10 Laptop & PC Hingga 3 Kali Lipat
1. Matikan Antivirus Windows 10
Salah satu cara mengatasi windows 10 yang lemot adalah dengan mematikan Antivirus.

Ketika spesifikasi PC atau Laptop yang kamu gunakan sangat minim, maka Antivirus akan sangat membebani sistem pada perangkat yang kamu pakai.

Hal tersebut dikarenakan Antivirus memakan sedikit resource dari Processor, RAM dan Harddrive yang ada.

2. Matikan Semua Startup
Untuk mematikan startup, ikuti langkah-langkah berikut ini:
Klik kanan pada Task Bar lalu pilih Task Manager.


Cara membuka task manager
Lalu pilih tab Startup.
Matikan semua startup dengan status Enabled menjadi Disable.

Cara mematikan startup
Cara mempercepat startup windows 10 yang paling mudah dan praktis adalah dengan cara mematikan semua startup yang ada.

Ini merupakan salah satu cara mempercepat kinerja windows 10 dengan ram 2gb yang sangat ampuh karena startup akan menggunakan RAM yang cukup banyak saat laptop atau pc baru pertama kali dinyalakan.

Mematikan Semua Startup tidak akan membuat laptop atau pc kamu rusak.

Fungsi startup adalah untuk membuka sebuah aplikasi secara otomatis pada saat PC/Laptop dinyalakan.

Dengan mematikan semua Startup, maka ada beberapa fitur dari software yang kamu install tidak akan berjalan secara otomatis dan kamu harus menjalankannya secara manual jika diperlukan.

3. Matikan Efek Visual
Berikut ini cara mematikan Efek Visual pada Windows 10:
Tekan tombol Windows + E untuk membuka Windows Explorer.
Klik kanan pada This PC lalu pilih Properties.


Halaman Explorer
Pilih Advanced system settings pada menu sebelah kiri layar.


Cara mengatasi Jendela System Properties
Pada bagian Performance, tekan tombol Settings…


Jendela Advanced System Properties
Setelah itu, pilih Adjust for best performance lalu tekan tombol Apply.

Mematikan Visual Effect
Cara mengatasi windows 10 yang lemot yang juga sangat ampuh adalah dengan cara mematikan visual effect windows 10.

Visual effect adalah fitur dari Windows 10 agar tampilan lebih nyaman dilihat dan terlihat bagus.

Jika laptop atau PC yang kamu gunakan spesifikasinya pas-pasan, maka matikan saja semua Visual effect yang ada karena kamu ingin memaksimalkan fungsi dari Windows 10 bukan penampilannya.

4. Hapus Cache Dan Berkas-Berkas Tidak Terpakai
Untuk menghapus Cache dan Berkas tidak terpakai lakukan langkah berikut:
Buka This PC atau Explorer.
Klik kanan pada Harddisk yang berisi Instalasi Windows lalu pilih properties.
  • Harddisk Properties
  • Tekan tombol Disk Cleanup.
  • Pilih File yang perlu dihapus lalu tekan tombol Clean up system files.
  • Tunggu prosesnya hingga selesai.
Kamu juga bisa melakukan proses diatas melalui software gratis bernama CCleaner.
Ketika kamu mengakses internet, ada berkas-berkas sementara yang tersimpan didalam system laptop atau PC yang kamu gunakan.

Selain saat mengakses internet, ketika kamu membuka program-program tertentu, Windows juga akan menyimpan beberapa Temporary Files yang berguna untuk mempercepat program ketika dibuka dan ditutup secara berulang kali.
Terkadang berkas sementara atau temporary files dan cache dapat membuat File System membesar.

Dengan membersihkan itu semua, maka kapasitas penyimpanan pada File System drive akan lebih longgar dan mengoptimasi sirkulasi file system.

5. Defrag dan Optimasi Media Penyimpanan
Tekan tombol Start lalu Cari Defragment and Optimize Drives


Hasil Pencarian Defrag dan Optimasi Media
Lalu Optimize semua Drive yang ada khususnya Drive C.


Defragment And Optimize drive
Tunggu hingga proses selesai.
Secara default, Windows 10 akan melakukan Defragment & Optimize drive seminggu sekali.

Selain cara diatas, kamu juga bisa menggunakan software yang jauh lebih optimal yaitu Auslogic Disk Defrag.

File-file Windows 10 yang tesimpan didalam media penyimpanan harddisk akan terus bersirkulasi selama kamu menggunakan PC/Laptop kamu.

Sirkulasi yang dimaksud adalah beberapa file tertentu didalam harddisk akan berubah, berpindah-pindah, terhapus dan bertambah secara berulang-ulang didalam sektor atau cluster harddisk.

Seiring berjalannya waktu, lokasi file didalam harddisk akan berada pada sektor atau cluster yang kurang optimal.

Dengan mendefrag harddisk, maka file-file tadi akan dikembalikan ke sektor atau cluster yang sesuai dan paling optimal. Hasilnya Windows 10 akan beroperasi jauh lebih baik.

6. Cara Mempercepat Windows 10 Dengan Regedit
Cara Mempercepat Windows 10 Dengan Regedit Mudah & Praktis
Beberapa komponen dalam Windows 10 bisa dikontrol melalui Regedit.
Salah satu cara mempercepat Windows 10 yang juga cukup ampuh adalah dengan merubah value atau nilai pada registry-registry tertentu.

7. Matikan Windows Update
Suatu hari kamu pasti merasakan bahwa Laptop atau PC membutuhkan waktu yang lama ketika hendak direstart, lalu kenapa restart laptop lama windows 10?

Salah satu penyebabnya adalah Windows Update. Kamu bisa membaca bagaimana cara mematikan update windows 10.

8. Tambah Kapasitas RAM
Ada sebuah cara mengatasi windows 10 yang lemot yang sangat terkenal namun membutuhkan biaya dan tenaga ekstra yaitu dengan menambah kapasitas RAM.

Ketika sebuah laptop memiliki RAM 2GB, maka bisa dipastikan Windows 10 akan menggunakan lebih dari 50% kapasitas RAM laptop tersebut.
Hasilnya, Laptop terasa sangat lemot ketika kamu sedang mengerjakan tugas, browsing dan menggunakan software tertentu.

Dengan menambah kapasitas RAM, maka kamu akan jauh lebih leluasa ketika hendak membuka aplikasi atau software yang membutuhkan ruang lebih pada RAM.

9. Cara Mempercepat Booting Windows 10: Gunakan SSD
Performa SSD jauh lebih baik dan lebih cepat dibanding Harddisk konvensional.


Keunggulan SSD
Dengan performa SSD yang sangat kencang, maka dijamin Waktu Booting Windows 10 akan jauh meningkat dengan pesat.
Tentu artikel ini jauh dari kata sempurna, maka pastikan kamu untuk selalu mengunjungi artikel ini karena akan diupdate ketika ada informasi baru yang didapat.

Cara Mematikan Auto Update Windows 10

Menonaktifkan auto update windows 10 diperlukan bagi anda yang kebingungan karena masa aktif sistem operasi windows 10 nya sering expired secara tiba-tiba.
Selain itu mematikan windows update kerap dijadikan sebagai solusi terakhir bagi sebagian orang yang kesal karena Windows 10 kerap melakukan update secara tiba-tiba ketika sedang bekerja hingga ketika sedang bermain game.

Hal ini menyebabkan game yang sedang dimainkan keluar dan membuat para gamer kesal.

Windows 10 adalah sistem operasi generasi terbaru dari Microsoft untuk komputer pada saat ini.
Windows 10 hadir menggantikan generasi sistem operasi sebelumnya yaitu Windows 8.1.
Windows 10 dikenal dengan sistem operasi yang paling sering update hal ini dikarenakan Microsoft terus mengembangkan Windows 10 hingga performanya maksimal.

Meskipun Windows Update adalah salah satu cara pengembang dari microsoft untuk memastikan penggunannya mendapatkan performa yang maksimal dalam menggunakan Windows 10, namun masih banyak orang yang menganggap update tersebut tidak terlalu penting sehingga bisa diabaikan.

Cara Mematikan Update Windows 10 Melalui services.msc
Tekan tombol Windows & tombol R pada keyboard secara bersamaan.
Ketik services.msc lalu tekan OK.
Cari kebawah hingga menemukan “Windows Update” dan double click pada service tersebut.
Pada menu Startup Type: pilih Disabled lalu tekan Apply dan OK.
Setelah anda restart komputer anda, Windows tidak akan pernah melakukan Update kecuali anda merubah Startup Type ke Automatic.

Langkah PertamaLangkah KeduaLangkah Ketiga

Untuk mempermudah, semua langkah diatas juga tersedia dalam bentuk video berikut ini:
Cara Mematikan Update Windows 10 Melalui services.msc

Jika cara Mematikan Auto Update Windows 10 diatas tidak berhasil, anda disarankan untuk menggunakan cara yang kedua dibawah ini:

Cara Menonaktifkan Update Windows 10 Melalui Registry Editor
Tekan tombol Windows + R secara bersamaan untuk membuka perintah Run.
Ketikan regedit lalu tekan OK.
Arahkan ke direktori registry berikut :HKEY_LOCAL_MACHINE\SOFTWARE\Policies\Microsoft\Windows
Klik kanan pada folder Windows pilih New dan pilih Key.
Beri nama key baru tersebut dengan nama WindowsUpdate.
Lalu klik kanan lagi Pada folder WindowsUpdate yang baru saja dibuat > New > Key.
Beri nama key baru tersebut dengan nama AU.
Klik kanan pada key AU yang baru saja dibuat > New > DWORD (32-bit) Value.
Beri nama AUOption pada DWORD yang baru saja kita buat barusan.
Double click pada AUOption yang baru dibuat dan ubah nilai nya dari 0 menjadi 2 lalu tekan OK dan restart komputer anda.

Pada beberapa versi Windows 10, anda mungkin tidak diperbolehkan untuk membuka services.msc, untuk itu anda bisa menonaktifkan update windows 10 melalui Registry Editor.

Cara Menonaktifkan Update Windows 10 Melalui Registry Editor
Itulah tadi dua cara yang bisa anda ikuti jika ingin mematikan windows update pada windows 10.

Mematikan windows update memang membuat sistem operasi yang anda gunakan menjadi kurang optimal, namun menonaktifkan auto update pada windows 10 juga dirasa menjadi cara yang tepat untuk menghemat kuota internet hingga mempercepat koneksi internet karena tidak terganggu oleh proses download windows 10 update.

Anda bisa memilih untuk mematikannya dalam sementara waktu ketika anda sedang banyak pekerjaan atau ketika anda sedang senang bermain game agar tidak terganggu oleh Windows Update.
Lalu ketika anda sedang jarang memakai komputer, anda bisa melakukan update Windows secara manual atau mengembalikan perubahan pada service.msc atau registry editor ke nilai sebelumnya.